Last weeks near constant rain from Tuesday through Friday totaled over 6" locally. The whole area had massive flooding due to swollen streams and rivers, and it felt an awful lot like we were living in Seattle. One thing is certain, the rain sure put a damper on our front door work. After I jammed some toothpicks into the door jamb to fix the over-drilled hinges, we were decidedly on hold until the rains let up. Luckily, this weekend was quite nice, so we got back on the proverbial horse.
During the previous weekend we added some material to the hinge sides and bottoms of each door.
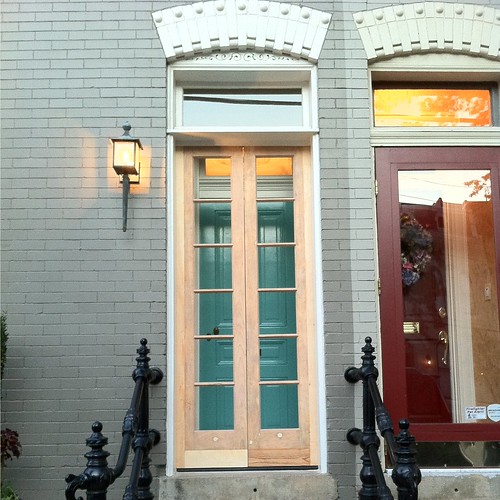
We also had to remove a 2x4 that someone had installed above the old front door to make the opening shorter. I've never liked the way it looked, and have always wanted the opening to be the correct size again, so we sized the new doors for the original opening size and went to work removing the extra piece of wood.
With the doors closer to the correct size, we cut and trimmed the French doors to get them properly sized for the outer opening.
And then we turned our sights onto mortising the hinges. Seems like a fairly straight forward task, but oh boy, let me tell you...
Hanging doors in an old house, especially double doors, especially salvaged doors, especially doors in openings that are neither square nor plumb, and especially every door in our specific house, has to be one of the most difficult tasks in all of DIY home improvement. Well, maybe difficult is the wrong word. What's another word for tedious, cumbersome, frustrating, infuriating, trim a little here, trim a little more there, don't make a mistake or you will end up running up the down the street throwing the doors into traffic? Yep, a word for that.
Over the years, I've hung my fair share of doors, and each one is a little easier than the last. I'm at the point where I can get the hinges mounted and lined up without much issue, and I can trim the door for the opening, but it still takes soooooo long. And it seems, at least lately, I can't hang a door without getting completely done and then finding out that it is slightly warped and won't perfectly fit in the opening. Anyone know how to unwrap doors? Ah, the pitfalls of picking salvaged materials and items.
Anyhow, we were onto this oh so tenuous hanging step with our salvaged French doors. Although I knew that a struggle may lie ahead, I also knew I could handle it if I just kept my cool.
I started on Saturday getting the hinge mortises prepared. I needed to cut away the toothpicks I had glued into place last week. I used the cutting blade of my Fein Multi Tool. That tool is amazing, I'll try to do a post on it in the next few weeks.
With the toothpicks cut flush, we were ready to mount the hinge. I held the hinge up to the new location, marked the necessary screw holes, drilled pilot holes, and then screwed the first hinge into place. Before I knew it, we were moving along quite nicely.
When I did the same on the lower hinge for this door, I only attached the center screw. There can sometimes be a little play to get the doors hung, and only fastening the center screw of the hinge allows you some wiggle room while getting everything into place. Don't drill pilot holes or anything until the door is hung and you are sure of the correct hinge location.
Once the hinges were on the jamb, I turned my attention to mortising the hinges in the door. The first step is to hold the door inside of the opening and mark the correct hinge location with a pencil. This is why I put the hinges in the jamb in the first step. I only mark the top hinge when I do this, because I can figure out the bottom hinge location based on measurements after I mount the top hinge in the door.
I dragged all of my tools out in front of our house so that I could work on the sidewalk. This would make for far fewer trips in and out of the house, and it also let me take frequent breaks as passers by asked if they could park where they parked without getting a ticket, if they were headed in the right direction, if I could come work on their house when I was done with ours, and so on.
To cut the mortise in the hinge side of the door, I used my router and hinge template. The first thing I had to do was to set the proper depth on my router. I'm using my plunge router base, so this is actually quite easy. Here's the trick I use that you might find handy too.
Using something hard (like the back of the hinge in this situation), I establish a zero point for the base of the router bit. Basically, this is the setting where the bottom of the router bit is flush with the bottom of the router base. Then I use the hinge template and the hinge itself as the total thickness of what I need to use. I stack the two items on each other, then I set the depth stop on the side of the router base to this thickness. Then I can depress the router to the proper depth and get to cutting.
Using my pencil marks for the top hinge, I placed the hinge template in the correct location and clamped some other wood on the door to support the front side of the template. Some quick but deliberate work with the router and I had myself a mortise.
The template leaves rounded corners at the back side of the hinge locations, so I used my chisel to carve out the corners of the mortise to give myself a nice square cut for the hinge.
The final step is to drill a pilot hole for a center screw, then mount the hinge to the door.
With the top hinge installed, I check the work by hanging the door. Since these doors are small, I don't have to worry about them damaging the hinges by doing this. All looked good, so I went ahead with the lower hinge on the door.
As I said earlier, I use the hinge measurements to mark where I want this one on the door. Using my tape measure, I measure from the top of the upper hinge in the door jamb to the top of the lower hinge. In this case, the measurement was 64" even. I transferred that measurement to the side of the door and repeated the hinge mortise steps with the template, again only attaching the center screw.
I put the door in place, dropped in the hinge pins, and had a functional door! It was that easy.
Unfortunately, the other side wasn't nearly as straight forward. Whenever you hang French doors, the first one is usually not that hard, but the second one typically introduces the majority of the hair pulling and throwing things.
If you recall from the toothpick post, I had filled the hinge mortise on the upper part of the right door with epoxy because of the significant rot. Using my hinge template I cut the new mortise from the epoxy covered opening. When you use a router to cut the wood epoxy I like to use, it throws it in the air and it kind of looks like it is snowing. The router does leave a very good and clean line in this epoxy.
Following a very similar set of steps from the left door, I placed the hinges on the right door and hung it in place, and this is where all of the futzing begins.
I didn't take any photos here, but it involved: Trimming the doors a few dozen times 1/32" at a time so that both would close, hand planing the side of the right door because the jamb was warped, hanging and rehanging over and over and over, working for many hours throughout Sunday, answering random questions from people on the sidewalk, all mashed together to give us a set of glassless wood French doors that hang nicely in their opening. Whew! That was a lot of work.
Unfortunately, the bottom of the left door is slightly warped, so the two doors don't close completely even on the bottom. I'll have to do something to sort of fake it with a middle divider piece of wood, but it is just at the bottom, and not too horrible.
We still have quite a bit left to do on these doors. Here is our punch list of remaining items we'll hopefully be working through this week.
- Mount rim lock
- Buy lock catch
- Buy slide bolt
- Prep knob, escutcheon and rosette
- Sand doors
- Attach central stop
- Cut hole for mail slot
- Install mail slot (using old front door mail slot)
- Buy OneShot Primer
- Prime doors
- Install glass/glazing
- Outside paint coats 1, 2, 3
- Inside paint coats 1, 2, 3
- Hang doors
- Install door stops
- Install slide bolt
- Install rim lock
- Install knob, escutcheon and rosette
- Enjoy doors :-)
As you can see, we still have quite a bit left to accomplish, but I'm hopeful it will run by rather quickly.
What do you think of the doors? Wendy doesn't like them much because they obscure out new front door. I think we'll end up keeping these doors open more often than not, but they'll be great for when it is very warm or very cold out, or we want to let Lulu or Mel sit and watch people as they walk by.