If you missed it, our house was featured yesterday in an Apartment Therapy House Tour. We are quite honored to be included in their running list of eclectic, cool, interesting, and often downright stunning houses. One of the items that garnered a bit of focus in the article and interest from some of the commenters was our built in office desk.
Today we'll take a step back in time to 2007-2008 to cover part one of an undetermined number of posts about our desk. The whole thing took us about six months to build, start to finish, but there was a lot of stopping and starting during that period. What else is new?
To be honest, this project is probably one of my most favorite projects that we've taken on. Being an amateur woodworker that had never attempted to build any actual furniture or cabinetry, it was an ambitious undertaking with a very *very* steep learning curve. We didn't have any plans or specs, just an empty space in an newly finished room that needed a desk in order for it to become our home office.
Sure, the whole process to get to a point where we actually needed a desk was a journey all its own, but that's a different story for a different day. These posts are just about the desk construction.
A year or so before beginning this project, we bought an antique 1850's bookcase that we absolutely love. We love the look, the color, and the feel. We knew this piece would end up in it's permanent place in our small home office, so we decided to use it as inspiration for our custom desk.
We started with a bit of a blank canvas, sketched out an idea of what we wanted the desk to look like (using two small pieces of paper), and got to work. Here's our very rough jumping off point. I felt this was more than sufficient to give me a start down my very unscientific path.
The whole thing started innocently enough with material selection. Given the deep and rich redish brown color of the bookcase, we decided that a solid cherry desk front and desktop with cherry plywood for the cabinet interiors would give us the deep and rich color we were looking for. I searched around and found a great online mill that would supply the cherry we needed in S4S at a reasonable price. The mill is called Baird Brothers, located near Canton, Ohio, and I've used them on several occasions since.
After placing the order for the wood I anxiously awaited for it to arrive. As much as I would have preferred to buy it locally, I just can't seem to find good pricing on good quality lumber at local mills. If anyone knows of a good one, let me know.
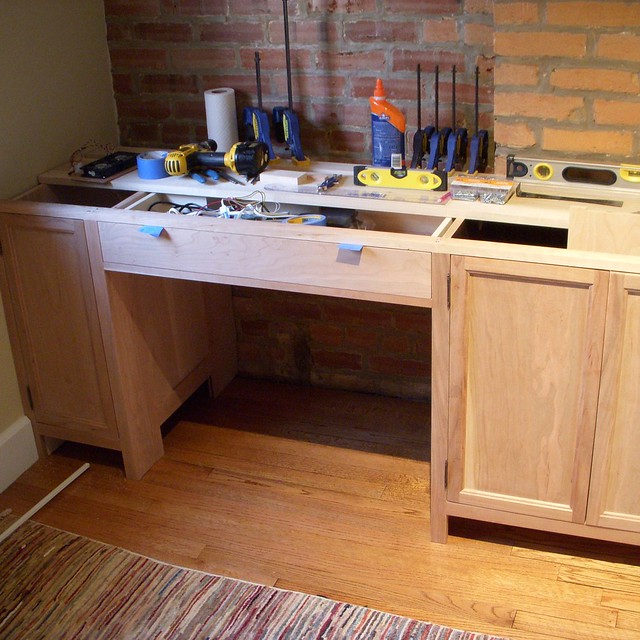
When the lumber arrived I immediately got to work. Using the table saw, dado blade, and miter saw, I started to assemble the carcases for the two lower side cabinets. The floor was out of level left to right and front to back, so I really had my scribing work cut out for me to make it sit level, plumb, and solidly on the floor. Look at how innocently the whole thing started.
If you notice, there is an outlet, network, and television box on the floor. The goal from the start was to make this a high tech desk that could easily house a computer and all related equipment with no significant visible wires. I wanted it to look like a classic and fine piece of furniture, but to also add a hidden "wow" factor.
I was well on my way using basic box construction with dados. I don't think I've ever checked for level and plumb as many times as I had to with the base of this desk. I knew how important it was to get it all squared, otherwise the whole thing would be off.
After a few short days of work the whole thing was starting to take shape. We kept checking how it would feel with a chair in place, where the front of the desk would sit, how it would work with the old chimney, and how it would fit with the baseboard cut we had left in anticipation of the desk. We even worked the back right corner of the right cabinet into the little nook between the wall and the chimney, there's a rule in this house that we waste no space. We also had frequent inspections from Mel. He always wanted to make sure we're doing top notch work.
The cabinet interiors were all plywood, but I wanted to use the solid cherry for all of the pieces you would see from the outside of the desk. I started to assemble all of the various external pieces and test fit them with the cabinet boxes. It seemed like the basement was full of clamps, panels, and saw dust for months on end.
After a little bit of work, the lower cabinets and boxes were taking shape. I also assembled the panel doors using solid cherry and my ogee rail and stile router bits.
Notice the left cabinet with its removable side panel? Since the computer is going in there I wanted to make sure I would have easy access to the back and side of it. I've always hated having to pull a computer out of its location to do any work on it. This was my solution to that. I also wanted to make sure the computer could remain cool in this tight space, so I cut a ventilation hole to run some exhaust fans, as well as a hole to run the hidden wires. I even cut a custom fan attachment and cover to make it all look finished and professional.
Embracing my true nerd fashion, I decided to wire the fans into the setup. Nothing says overkill like electronics built into desks.
In typical "cart before the horse" Old Town Home fashion, my stainmaster, Wendy, started testing out various colors that would work well. I say cart before the horse because we probably should have at least finished building the lower part of the desk before we started staining, but that's not how we roll.
Once Wendy had decided on a good stain color we got to staining the desk's interior. We opted to use a mix of Minwax Jacobean and Mahogany stain, applied in multiple coats. We decided to test it out on the interior of the right cabinet, and I'm very glad we tried it out on the interior. It was splotchy, and I mean super splotchy. This was something we weren't aware of or remotely expecting, but were able to resolve with a little Internet research and some stain pre-treatment.
Wendy says to ignore her bed head that looks a little like Donald Trump's hair.
The final piece of the lower section of the desk was the assembly of the center drawer. I decided to go with classic dovetail joinery for the drawer, and it actually turned out pretty great for my first shot at it. I also had to work in a little notch in the rear of the drawer to allow for the exhaust fans to work properly.
I feel pretty fortunate that all of my first time attempts on this project were actually turning out pretty well. Every night I would stop by the desk and look at it to figure out the next steps, and to enjoy what it was becoming. I was like a proud papa.
I also went to great lengths to hide all of the screws and fasteners use in the assembly. We used biscuits when connecting face frames to the cabinet bodies, and only placed screws in locations where they wouldn't be seen (like rear or side connections). It took a lot of planning, but it turned out exactly how I wanted it to. The end result of a largely finished desk bottom was quickly taking shape, and we both were loving the direction we were headed.
If we had it to do the project over again I would probably use an aniline dye rather than standard oil stain. I may have also used a 50/50 mix of boiled linseed oil and turpentine, but this was long before I was aware of such things.
What do you think, not too shabby for my first real attempt at making any sort of furniture? I'm just sad that if we ever move this serious labor of love will end up staying in the house. No matter what, I'll end up leaving my first ever furniture piece behind.
We'll be talking about this project over the coming weeks and covering the various ups and downs, ins and outs, successes and utter failures, and other experiences along the way, we've got our fair share of each.