Sometimes a tried and true building method beats the modern approach. When talking about old houses, I often feel this way about plaster vs. drywall.
Our good friends and blog readers, Doug and Gretchen, are fellow old home owners. After a lengthy search for their first place, they purchased a home in the H Street Northeast neighborhood of Washington, DC. Though many of the homes in that area have been completely gutted and renovated, when they were searching they held out until they were able to find a turn of the 20th century home with the majority of the architectural elements intact. But as with many homes that have not had a major renovation and are approaching or exceeding 100 years old, their house has had plenty of items on the "To Do" list.
Though Doug and Gretchen's home is similar to a Wardman style of home from the early 1900s, which is very prevalent in the H Street Northeast part of DC...
...their design style is more contemporary and modern than their house's age would let on. That being said, they appreciate the history and quality of the elements that make an old house a home. Unlike many with similar tastes, they aren't eager to rip out all of the old items to make way for the large "open concept living" that has swept the country in recent years. Instead, they are attempting to preserve and protect the original features of the home while incorporating their more modern aesthetic tastes through decor and color choices. As far as I'm concerned, this is how most should treat an old home, even if their goals aren't for period accurate restoration and decor.
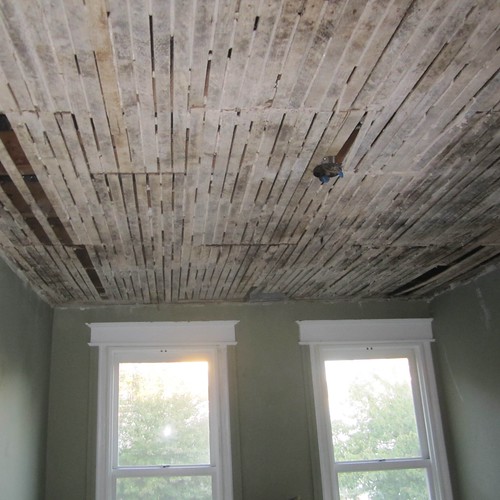
When Doug and Gretchen first had us over to take a look at their place, one of the first things I noticed was their guest bedroom ceiling. It was wavy, cracking, sagging, and seemed to make the whole room feel off balance and wonky. Their ceiling was obviously not the smooth and pristine ceiling that most likely adorned the house when it was built, but a ceiling that had been patched repeatedly after water damage or whatever else may have occurred. But it was still plaster, which hadn't been ripped out in favor of a drywall replacement.
You can really see where they were actually losing height in the room above the two windows. What should have been a straight line was sagging down several inches, almost reaching the window casings.
Doug started talking to me about what I would do to fix their ceiling issues. After looking at it I wasn't sure if what was there could be saved, but I told him that I would try my best to keep the plaster. At the very least, if the ceiling couldn't be saved in its original form, I would try to hire a plaster team to come in either do blue board with plaster skim, or even better, replace it with actual plaster.
I know this may sound odd, but my justification is simple, so hear me out. Plaster on lath, especially on the ceiling against an attic, affords many major benefits. The plaster will be thicker, stronger, and more substantial, which will result in greater noise and temperature insulation. The whole room will remain quieter, any noise from the attic, like rain on the roof, won't transfer through as easily, and the room will retain more of its heat, as it's like an extra small layer of insulation. Beyond the practical nature, a plaster ceiling with its very minor imperfections and undulations will fit with the house and will look more appropriate. It's a subtle thing but you can often tell when you walk into a room if the ceiling is plaster or drywall.
Armed with this knowledge, Doug and Gretchen began searching for a contractor that would come in and actually apply plaster. This was a difficult prospect on its own, but through diligence, and even after a few contractors even tried to talk them out of using plaster, they were able to find a group who would do the work they wanted them to do.
The first step in their project was the massive and messy demolition. The plaster had sagged way too far and had been patched too many times to be saved, so the crew opted to remove the existing plaster. I have to say, though was a bit sad to see the original plaster go, it was exciting to me that they were taking the extra steps to retain plaster. After a very messy period of demolition (any way you cut it, plaster demo is a mess), and dust covering many surfaces of their home, they had a guest bedroom ceiling that was just waiting for its new ceiling.
With the demo complete the plasterers moved onto their next step in applying the diamond lath to the ceiling. Diamond lath is a tight metal grid that is rolled out and nailed or stapled to the surface. When the plaster is pushed through the lath, the "keys" harden and allow the plaster to really stick to the lath. The wood lath was great but the spacing between keys was larger, which ultimately ended up with more cracks and failures. The diamond lath is a more modern approach that will end up with a better long term product.
As you can see, they also took the opportunity to add some insulation to the room, which is a must if you have the kind of access removing a ceiling affords.
The plasters completed prep on the ceiling and the portions of walls that had been patched and then jumped right to work on the scratch coat of plaster. I was getting a play by play of the work they were doing, and it was great to hear how fast everything was moving along. It seemed like these guys really knew their stuff.
The plasterers built a platform in the room to allow them to work directly on the ceiling without ladders. I've done the ladder game and have to say, this approach is a thousand times improved over climbing up and down the ladder every 10 seconds.
The scratch coat establishes a base for the final layers of plaster to hold onto. It creates the keys through the lath without putting too much weight on the ceiling before hardening. It's actually called a scratch coat because the final step is to mark up the surface before it begins to harden. These marks give the coat "teeth" for the next coats to grab onto. The tool the plasterer is holding is what creates the "scratch" coat.
When all said and done, the first layer of plaster was established and ready for the brown coat.
After the scratch coat had dried sufficiently, the plasterers began applying the brown (or float) and finish coats. With plaster this means multiple coats that each get a little smoother and a little nicer. Plaster sets up quickly depending on the mix, so pros can work fast, applying thin coat after thin coat to get that nearly perfectly smooth and even final look. The most important tool for this is the large plaster float.
Knowing how fast these guys work verses how fast I work is mind blowing. I mean, what they can get done in an afternoon easily takes me days. It's pretty humbling.
After just a couple of days on the job, Doug and Gretchen's ceiling had gone from sagging and unsightly, to even and smooth.
The window casings, which were nearly swallowed by the old sagging ceiling, now stood on their own after they gained 4" - 6" of additional ceiling height in the room.
The walls had also been patched where they met the newly applied ceiling, giving them a nice corner with all of their additional headroom.
Ok, this is all fine and good, but I know some of you are wondering about the cost? There is a common misconception that doing something like this takes a significant amount more money than just having someone do the room with drywall, but it is just that, a misconception. To do this project correctly the old ceiling had to be demo'd, you couldn't just put a layer up over the old one and call is a day. Doug and Gretchen pursued several quotes from different contractors who all suggested to do the job a different way. The quote they received for the work they had done in plaster was actually slightly lower than the quote they received for drywall.
The thing is, regardless of the approach, to really do the project right took about the same amount of materials and labor. In the end it's a win/win in my book. The house still has the look of a ceiling that matches the rest of the walls, and it didn't cost an arm and a leg to achieve that look.
I know the process of applying plaster rather than screwing up and mudding some drywall is much more labor intensive, but it is more appropriate for the house, more traditional, and has a better looking end result. If you're faced with the same decisions on your house, I hope you'll take a little extra time to look at all of your options. Don't just listen to what the first contractor that comes along tells you. Contractors are good at scaring homeowners into decisions by making wild statements. Come armed with patience and a plan and you're sure to end up happy. That's what Doug and Gretchen did, and they're quite happy with the end results.
In the coming weeks we'll be sharing some more details of our plaster adventures in our house. While we won't be redoing the plaster in an entire room, we will be breathing life into the original plaster on the living room walls of our house by using the Master of Plaster restoration plaster system.