We are going to pre-empt this week's regularly scheduled Toolbox Tuesday post with a little seasonal decorating idea that you can use in your house. We've been unpacking all of our Halloween decorations and deploying them throughout our house. No joke, it sort of looks like Halloween bombs have gone off inside our home.
Being a row house right on the street in Old Town Alexandria, Virginia, there are not a lot of things we can do to the exterior of the house to show our Halloween spirit. If we had a yard, we'd make a graveyard, a better walkway, maybe a coffin or two, but with a flat front home, we really can't extend out onto the sidewalk. However, we have three large windows on the front of our house that are just waiting to be used to express our seasonal exuberance.
Several years ago I saw that Martha Stewart was selling spooky window silhouettes. This spawned the idea of modifying the concept to create what looks like window sheers during the day, but at night with back lighting from inside, the haunting silhouettes would appear in our windows.
With only three windows on the front of our house, I could knew I could easily put together a few faux window treatments to accomplish this effect without too much time, effort or money.
Rather than a collection of various sinister characters (like the photo in the Martha Stewart Magazine), I opted to create three ghosts. Drawing and cutting ghosts would make this project a whole lot easier than trying to create and transfer a witch, Frankenstein, or Dracula. Ghosts would also be far easier to understand if you quickly glance at the home from the street while walking or driving by.
Here's a breakdown of how to complete this fun and festive Halloween craft project.
Supplies
The supplies you will need are actually pretty basic. You should be able to find the first two items at your local fabric store. First buy some off-white muslin or equivalent loosely woven fabric that will easily let light shine through. Buy enough to fully cover each of your windows in which you'd like to hang these silhouettes. Next you'll need some thick black felt in roughly the same length as the muslin. Other basic supplies include a piece of chalk or pencil, a needle, thread, hot glue gun, scissors, and a couple of strings or hooks.
Pattern
First, determine the various sizes of your windows and cut the muslin to be slightly larger than each opening. The muslin, when hanging in the window opening, should be just a bit larger than the window so light doesn't shine through around the edges.
With the muslin cut, cut panels of the black felt in roughly the same size and lay it on a large table. This is the fabric you will use to cut the silhouettes of your ghosts.
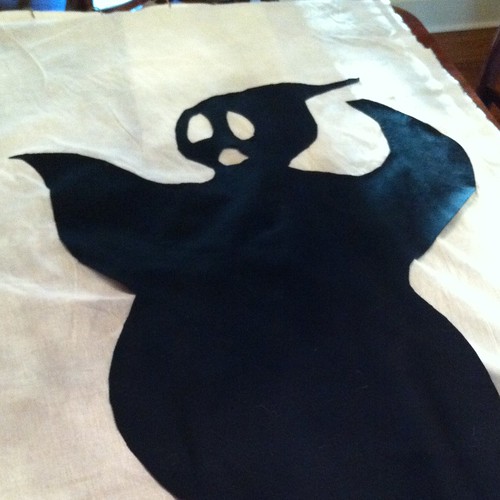
Next, using your chalk or pencil, freehand an outline of your silhouette in the right size for your windows. (Choosing a ghost for this was definitely the easiest shape to draw.) Using the scissors, cut along your outline in the felt as well as cut out the eyes and mouth.
If you're looking to save time, you can freehand just one and use it as a template for the remaining windows. Next, lay your felt cut outs on the muslin fabric and determine final placement. Think about if you want the silhouette high or low in the window, or centered or off to one side. Varying the placement of each silhouette adds more visual interest.
Affixing the Ghosts
Now that you've determined the placement of the silhouette, use your glue gun to apply glue to a few key areas on the top of your cutout. In this case, I glued the head and arms to the muslin. Apply the ghost to the muslin and press with even pressure to make sure the ghost sticks to the muslin. Use just enough glue to keep the ghost in place while you affix it more permanently.
Once the glue dries, use the needle and thread to loosely stitch the perimeter of the ghost to the muslin. I stitched only the top half of the ghosts to make sure they would stay in place but would be able to hang free on the bottom. This gives the illusion that the ghosts are floating and also ensures the ghosts don't wrinkle or bubble while in the window.
Hanging
With the ghosts applied to the muslin, the last step in the project is to hang the new "curtains" in the windows. We have standard curtain rods on each window and use the curtain rod to hang each silhouette. We doubled up the muslin on the top of each silhouette by folding it over, and through the double thickness cut a few small holes. Through each of the holes we threaded string that we tie around the curtain rod to keep the fabric in place.
If you don't have a curtain rod over your window, consider using thumb tacks or sticky tack to secure the fabric.
Admire
Wait for it to get dark out, then turn on all of the lights in your house and go check out your spooky addition. When the sun is up, it just looks like you have some white curtains in the window, but when the sun goes down, it looks like your house is in the midst of an active haunt.
Another bonus? The silhouettes look great from inside your home too!
We love this craft project so much that we've been using our ghosts for several years now. They always get a great reaction when people see them, and we often hear people walking by the front of the house commenting on them.
What do you think, not too shabby for a spooky low cost project? Do you do anything similar to your home's windows? Maybe you go all out and put this little project to shame? We'd love to hear what you do to bring your home to life during the Halloween season.
As seen on...
The 36th Avenue