Today's post is a little later than usual since a few coworkers and I were running around the Lincoln Memorial this morning taking photos of the Space Shuttle as it arrived and flew around the city on the back of a 747 transport. Here's one of the better photos of the morning.

I'll try to get some more and my experience up in the next couple of days. Coming from someone who has always been a bit of a space nerd, it was really something cool and I'm very glad I had a chance to see it. But now, back to your regularly scheduled Toolbox Tuesday.

One significant aspect of old home ownership and restoration is the general appreciation for and retention of the materials or items that are original or period to your home. I've spent a lot of time in previous posts talking about the particular attention to detail I tend to give to authentic and salvaged hardware in our home, but that's just the tip of the iceberg. In addition to hardware, you'd be hard pressed to find any old house that retains much of its historic fabric that doesn't also posses its original thick plaster walls.

Plaster and lath, often mixed using horse (or even human) hair in the scratch and base coat, is one of those characteristics of old homes that are too quickly torn out when many begin undertaking a renovation of any magnitude. The perception that is it difficult to restore, even harder to maintain, and an inferior product compared to the cheap as flimsy drywall options are all as incorrect as they could possibly be.

Throughout our time renovating the house I've gone to great lengths to ensure that we save as much of the home's original plaster and lath walls and ceilings as possible. During this time there have been few items more useful than plaster buttons when it comes to bringing our cracked, sagging, an near ruined plaster back from the brink and ready for another hundred years hanging in place.

"Plaster buttons you say?"

Exactly. Other old home owners take notice, this could be one seriously valuable blog post if your house was built prior to the mid 1950s.

When we purchased our home, every single room had a ceiling that had seen better days. Most were textured, crumbling, cracking, and suffering from a series of bad and uneven patch jobs. After digging out the poor attempts at patching, we were left with rooms that looked like this.

The biggest issue with restoring plaster is the fact that, over the years, the plaster and lath have often shifted or sagged, especially with ceilings. This causes the plaster "keys" (part that oozed through the lath and dried) to crack, which results in surface cracking, weakening, and ultimately, failure in the plaster (especially noticable when shit ends up falling on your head). But wait, you don't need to just throw up your hands and play Chicken Little, you can easily fix this. Before you end up with a plaster disaster on your hands, you must somehow secure the plaster back in place without causing any additional damage to the already cracked surface.

Using regular drywall screws is pretty much out of the question. The surface area of the screw that comes in contact with the plaster is far too small. This means that too much pressure is put on too small of an area and the result is a much larger and more unstable crack in your wall or ceiling as soon as you tighten the screw. Honestly, using a drywall screw alone will result in pretty much the last thing that you want to happen.

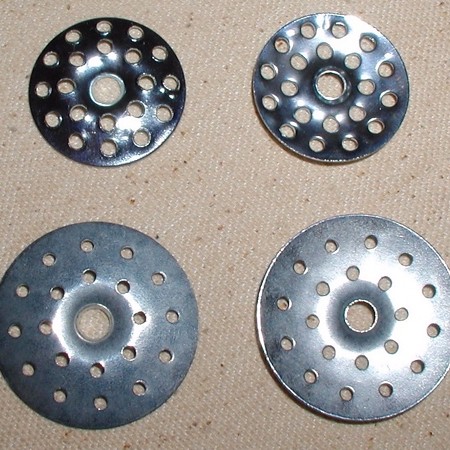
This is where plaster buttons come into play. Plaster buttons are essentially small and nearly flat thin metal discs with little holes all around and a larger hole in the center.

Today they come in two sizes, small and large, but back when I started using them, only small we're available. Ever since the larger buttons came out I've been pretty much using them exclusively on all of our projects.

The key to these buttons is the fact that the center accommodates the screw, and as you tighten the screw, the button flattens against the wall or ceiling. As it flattens, it pulls the plaster back into it's proper position and distributes the weight across the surface area of the button, which helps prevent the cracking you'd get with a smaller means of securing the plaster.

When I apply plaster buttons I like to place them every eight inches along the joists in the room using a 1 5/8" drywall screw, even if the ceiling paster looks to be in good shape. Remember, lath was nailed to the joists, and gravity has been working against those nails for over 125 years in our case. Sometimes, as with the dining room, each button I put in you could visibly see the ceiling move up between a half to a full inch. If this happens in your project, don't fully tighten them one at a time. Work your way around the room tightening a little more each time. This way the hole ceiling moves as one and won't crack at a specific spot when too much pressure is applied.

Once all of the joist screws are secured, find the true trouble spots in your plaster. Things like large cracks, water damaged areas, the areas immediately around large holes, or places where you see some noticeable sag. In these instances, use a 1 1/4" drywall screw and secure the buttons in a way that ensures it goes into the lath. The lath and button will be sufficient to hold the plaster in place but the lath isn't as sturdy as the joists and won't hold a screw as well, so don't over tighten.

You'll want to put buttons in these problem areas much closer together and follow either side of a crack or around the perimeter of a holes. I always feel like I'm overdoing it, but this is the right way and it will end up looking very good in the long run.

Once all of the buttons are in place you can skim over the buttons with your covering of choice (typically with lime based plaster or joint compound, depending on your application). The small holes all over the buttons give you some traction so that your plaster or joint compound can really stick too the button. You might need to do a few coats over these buttons to get them totally hidden and smooth, but the appearance of the finished project is almost perfect.

The end result of this effort is a beautiful and intact original plaster wall or ceiling that is ready to continue standing the test of time. Too often the plaster and lath walls are being lost to the "gut it all" crowd, but this is often an overly aggressive approach to a situation that can be solved with a few dollars of metal buttons. It's more Eco friendly, often more energy efficient, allows for less sound transmission, and retains that historic character that has been far more elusive over the last few decades.

I hope you'll consider using plaster buttons to restore and save some of the historic fabric of your home.

Have you ever used plaster buttons in any of your projects? I know plaster walls can be intimidating at first, but learning how to love them will make living in an old house much easier.

We have a whole series of plaster repair/skim coating posts you should check out if you like this or are trying to tackle the same thing. Here's the whole list for convenience:

  1. Plaster Repair for DIYers - No Need to Rip It Out
  2. Plaster Buttons to Fix Your Crumbling Ceiling - this post
  3. Plaster Repair Part 2: Laying a New Brown Coat
  4. How To Fix Plaster Like a Boss: Sand Baby Sand
  5. DIY Plaster Repair: We Finally Put the Skim in Skim Coat
  6. My Skim Coating Nickname is Mr. Smooth - The Tricks I Use to Earn It
  7. More to come..
Comments 29

Comments

Kelly
4/17/2012 at 2:11 PM
HOLY EFF BOMB! I watched a This Old House tutorial about fixing cracked plaster where they used washers and screws, but I never knew they made plaster buttons. This post saved my life!

We have a huge crack on our ceiling going up our second story staircase, i just fixed it with a mesh patch and joint compound, but damn I wish I saw this earlier.

What kind of screws did you use? What do you do if there's no lath under your plaster?
Alex
4/17/2012
We used the normal coarse thread black drywall screws that you can pick up at any big box store.

Hrm, if there's no lath... If it's plaster on brick it's hard to do much more than mesh tape and skim. I might dig out any cracks a bit more and then fill with new plaster, but you might risk dislodging more than you want. If it's on diamond lath (the metal stuff), you could possibly still use the buttons and do some sort of an anchor or toggle bolt behind it to pull it tight.

When I'm using the buttons and I miss the lath (if it goes between boards), I just take it out and move to a spot that has them.
4/17/2012 at 2:21 PM
We gutted our bathroom, but I don't feel bad about that since 2 of 4 walls were replaced with 60s era drywall anyway. And the water damage was outrageous so most everything needed to be pulled out anyway.

I will admit that I don't care for plaster, but I am interested in giving these things a try. One of our spare rooms is in better shape than most of the other rooms, and I'd like to see if I could handle this.

Now to convince the other half!
Alex
4/17/2012
Sometimes, sadly, it simply can't be saved or isn't worth saving. I've had to pull down a few sections of wall and have hated it, but I knew it was the right thing. It happens.

The main thing I've learned is that it takes patience. Lots and lots of it. That and dust. I just appreciate how much less debris and waste we have from a project, and that it actually keeps the house warmer and quieter.
Tee
4/17/2012 at 3:24 PM
I saw the Space Shuttle when it stopped at the Atlanta Airport many years ago. It was really thrilling. I think every employee was on the roof of the building to see the event because we were located adjacent to the airport and had a front row view. After all, we were FAA employees and had/have a vested interest in the aviation industry. Do you think the Space Shuttle will end up handing from the ceiling of the Air and Space Museum?

I found the plaster buttons very interesting. They looked like they were about 3" in diameter in the first photos and only realized how small they were seeing them in the ceiling.
Alex
4/17/2012
The shuttle was so much larger than I expected. As far as I know they're going to be displaying it on the floor of the Udvar Hazy Air and Space Museum at Dulles (still a Smithsonian). I can't wait to get out there to check it out. I think it would be a bit too big and far away if it were hanging on the ceiling.

You're right on the size, they aren't that big, but they are perfect for distributing the weight for reinforcement.
laura
4/17/2012 at 3:59 PM
After spending the last two months working on plaster repair in our home using these plaster buttons (we call them plaster washers in the midwest), I can honestly say they are one of the worlds best inventions.

However, you make the skim coat process look like a breeze! After several skim coats and hours of sanding - I'm still not satisfied with the finish. It's definitely a form of art!
Alex
4/17/2012
I remember hearing them called plaster washers back in Ohio. I've also heard ceiling buttons and ceiling washers. I am so happy that we've used them, very rewarding in the end.

You're right, skim coating is not easy. I wish I could just snap my fingers and have a house elf do it for me. I've done at least six entire rooms now (walls and ceiling) and finally feel like I'm starting to get good at it. It didn't come easily, that's for sure. I think I typically do three to four coats with sanding between each one before I'm happy, and then I still find spot issues. The key for me is the use of an power sanding pole that hooks to a vac, drywall dust filter bags in the shop vac, and a hepa filter. Without this I couldn't stand the dust enough to finish the job.
4/17/2012 at 4:39 PM
Those are nice! We order ours from Kilian as well because it seems like nobody around here keeps them in stock. I keep saying one weekend we're going to go to Philadelphia to have a look around their store. One of these days...
4/17/2012
It is right up the street, only about 2.5 hours :-) Next time we visit up that way we'll have to make a point to drop by. They have so many cool items. I have to imagine the Internet is what keeps them going.
bfish
4/17/2012 at 6:13 PM
Plaster ceilings in our 1920s house were all wallpapered and painted over, with plenty of cracks underneath and a few places with large chunks missing. We wimped out and had drywall hung over it. I've removed layers of wallpaper from all or most rooms of probably half a dozen old houses over the years so "the coverup" was very attractive as a solution. We didn't have a lot of money either when we moved here but the ceiling fix was one of those urgent essentials that couldn't be put off for years like so many other projects have been!
4/17/2012
Ugh, wallpaper removal is the WORST! I don't blame you one bit!
4/17/2012 at 10:06 PM
It looks great, but, it really doesn't look like less work than replacing with drywall! You don't have to skim coat drywall!
4/17/2012
You are right. I definitely wouldn't say it is less work than drywall, but I'm looking at it from both a waste and preservation standpoint. Though drywall would probably be easier and faster, it's my preference to keep what we've got in place.

The other thing about drywall, I'm kind of weird and I like to skim coat drywall too. I feel like it gives our old house the plaster look even if it isn't plaster. Very smooth with slight irregularities. It's just the look we're going for.
threadbndr (karla)
4/18/2012 at 10:43 AM
THANK YOU! You know that I've got lath and plaster in all but one room of THE Bungalow (that's the sleeping porch that we converted to a second bedroom - the one that came with the ivy inside the walls.) I do have cracks in the ceilings in the living and dining rooms - not bad ones, but a little extra security never hurt.

BTW, I have the wallpapered ceilings and I'm actually thinking about re-wallpapering them after we strip and repair (several years down the road). It's historically accurate for an Arts and Crafts house. The other option is paint and stencil. I have full box beam ceilings and either one would look good.
Wendy
4/18/2012
You're welcome! So glad we could help. :-)

Good luck! And the wallpapered or stenciled ceilings sounds like the perfect touch for your home.
Brendan
4/18/2012 at 2:02 PM
The key to a good skim coat is to keep your trowel wet with clean water. You reduce friction and tendency for skim coat to be pulled. You end up essentially polishing the skim coat. The trick is to not pull the float straight off because then you'll pull up the skim coat because of surface tension. You glide the float off at a bare angle.
Tahroma Alligood
4/23/2012 at 8:20 PM
I love these things. Too bad we have to get them shipped to us out here in the west!
6/27/2012 at 1:42 PM
You did a really nice job restoring this ceiling. Thanks for the link to the plaster buttons, I'll definitely have to look into getting some.
Kevin
5/25/2013 at 11:37 AM
I've been using these for years - and not just for plaster work. They are great for hanging cabinets, esp. those made of pressboard that will carry a lot of weight & I use them to attach wire fence to posts [unlike fencing staples you can back the screw off to move your fence & or posts, etc.]
Wendy
5/27/2013
Wow, great ideas. I wouldn't have thought to use plaster buttons on cabinets. Thanks for sharing these tips, Kevin!
Steve F
11/20/2013 at 7:47 PM

Great comments. I discovered ceiling button washers about 10 yrs ago. I removed the wallpaper in a 100 yr old house bedroom & large sections of the walls were buckling. I probably went through a couple of hundred of the washers with the washers pulling together sections like a surgeon with stitches. One small area needed a sheetrock/plaster patch. I skim coated the whole room & proceeded to blow out a Sears shop vac in the sanding process. The room still looks great & after a long break will attempt another. A key is to put plenty in. Definitely way less expensive than Sheetrock & no demo (plaster is very heavy). This time I'll try to avoid skim coating the whole room.

Mark Doris
9/11/2014 at 5:21 AM

Great info! Right down our alley! Thank You!

Kim
3/5/2015 at 11:15 AM

We're going through this process right now with one of our bedroom ceilings and I'm finding it endlessly frustrating. In addition to reading your posts what seems like dozens of times, I watch some YouTube videos and felt super prepared for this but I feel like the learning curve is really steep for me.

Was screwing the buttons into the joists hard or am I am I missing some life changing trick? Finding the joists was our first struggle—we eventually settled on the magnet method but that seems weirdly hit or miss. But screwing in the buttons is the most frustrating thing I've ever done, I feel like I can't ever get the screw started and keep it straight and it seems to take a lot of work to sink it. Is that just the nature of working on a ceiling? Is there a particular bit that would maybe make the job a little easier?

Rae
6/28/2015 at 5:08 PM

I am SO excited to have found these articles... you have just made the difference between giving up on trying to buy an old 1892 farm house I fell in love with and making the decision that yes we CAN do this and create a livable home!!! I'm not even interested in restoring and making a "lovely and socially acceptable" house out of it... I just want to live in it and preserve it so it'll last the rest of our lives (we are in our 60s) Your articles cheered me WAY up!!! We can do this!!!! I'd give you a hug and a kiss if I could!!!

Now.... any advice on rotted sill beams? LOL!

Sam Barbary
11/15/2016 at 8:58 PM

I've used these plaster buttons many times. I finally figured out to get the buttons concealed, I counter sink them into the plaster. I use a grinder tip to drill a 1/8" depression in the plaster slightly larger than the button. This way the button is slightly below the plaster surface. The extra step is definitely worth it.
Another solution to this intensive procedure is to use 1/4" sheet rock over the existing walls and ceilings. I take off the ojee or base board cap moulding before installing the sheet rock. While some say you lose the character, you really get a crack free surface without gutting plaster and lath. You spend more on materials, but again, it's crack free.

Deborah Sizemore
7/7/2017 at 1:42 PM

Oh thank you for this. A chunk of ceiling came down and I was going to pull it down and sheet rock. Now I can fix all my ceilings instead of waiting for gravity to happen.

Jeff Haumesser
1/18/2019 at 8:45 PM

Can I use these buttons on Plaster with METAL Lath? If not, what would be the best approach to fixing ceiling cracks?

Li Pipman Denaut
10/11/2021 at 8:41 AM

I just found your site and am encouraged and dare I say, excited? We've had a cracked/falling lathe and plaster ceiling in our bedroom (1923 home) for quite some time, each year getting worse and worse and now the idea of fixing it sounds feasibleAlt smile! Thank you for sharing your experience and information.

One quick question - there are 1" plaster buttons and 1.25" plaster buttons, the larger having less holes. Would you recommend the 1" with more holes or the 1.25" with fewer holes. My gut feeling is to go with more holes to allow for the grab effect but wanted to ask your opinion--thank youAlt smile!

Since you've not signed in yet, you will need to fill in your name and email below. If you have a Facebook account, save yourself a step and use Connect to login.

Denotes a required field.

Please enter full URL, including http://

You can use Markdown syntax in your comment. And you can also use lots of Emoji!
  • Search

  • Login
  • Follow
  • Advertising

If you're looking for information on advertising and sponsorships, head on over to our sponsorships page. You can purchase site sponsorships in a few easy clicks. 

Toolbox Tuesday
Open Housing
  • We're Featured!

Old Town Home has been featured in the following places and publications:

The Washington Post
 
Washingtonian Magazine
 
Domino
 
Old House Journal
 
 
Apartment Therapy House Tour
 
Washington Post Express Feature
 
Home & Garden Blogs
 
© 2024 OldTownHome.com. - Privacy Policy
Login Below
or
Sign in with Facebook
Connect

Unexpected Error

Your submission caused an unexpected error. You can try your request again, but if you continue to experience problems, please contact the administrator.

Working...

Working...