In a previous post, we talked about the quick guest room makeover we completed in anticipation of a friend's visit. Being a small guest room, one of the focal points of the room is the bed and headboard combination. Afterall, as you can see from the image below, a bed without a headboard just doesn't look complete.
A few years ago we were working on our master bedroom. As you may know, I am a real stickler for original and accurate architectural details. The main door to our bedroom (on the right) is one of the old original 1880's four panel doors in the house, but the old door to the bathroom (on the left) was a 1980's six panel door that didn't remotely match the style of the rest of the doors in the house. It had to go!
The photo above is pretty much the only one I could find that shows both the original door and the 1980's bathroom door. It also shows our master bedroom in all of its un-fixed-up glory. Missing transom, brass door knobs, thick and nasty paint...ugh.
The door was a good, solid wood door, not something hollow core, but it still didn't belong in our house. However, once we removed it, Wendy and I opted to save it and it sat cluttering our home for several years. First it sat in the master bedroom while we worked on that room, then it sat in the master bathroom as we began work in there, then it sat in the basement "wood shop" area, and finally it came to live in our guest room/junk room (you can see it hiding behind some of the junk in the photo below).
We kept looking for people that would take it or hoped to find an alternate use for it in our home (maybe an eventual door in the basement?). Then, one day a couple of months ago, as we were coming to grips with potentially throwing it away, Wendy looked at me and pronounced, "That old bedroom door is going to be our new guest bedroom headboard." A new project was born, and joined the many other projects on our all too long list.
Well, we knocked this project out a few weeks ago and wanted to share the steps with you in the event you would like to create one of your own. Using an old door you have on hand, or visiting a local salvage yard for a style of your choosing, you can pretty easily transform it into a low cost headboard that looks great and will last for years to come. Here are the steps that we followed:
1. Inspiration
We credit two headboards from Pottery Barn as the inspiration for the project. They gave us an idea for the look we wanted to achieve, but we planned to significantly adjust the scale since Pottery Barn always assumes you live in a 5,000 sqft+ home and not a 15' wide row house. More than a specific look, I was paying attention to the details of the headboards. The little shelf on the top, the "crown" detail, the panels, and the side support pieces were all items we wanted to mimic in our project.
2. Measure the Bed
The first and most important thing is to measure the width of the bed you are building this headboard for. Our project was intended for a queen size inflatable bed, and we determined that roughly a 60" width would be good for our needs. Given the various heights of doors available, you can accommodate most size beds. In our case, we were lucky that our existing door worked with our existing inflatable mattress.
3. Door Selection
This step was easy for us since we were reusing a door we had on hand. But if you are buying a salvaged door for the project, you have a lot of additional flexibility. (Many times you can find old doors for purchase at your local salvage yard or Habitat for Humanity ReStore, flea markets, etc.) You can use almost any setup or style of door out there, and there are so many to choose from. However, there is one important aspect to this selection process, the configuration of the door needs to have symmetrical paneling at least the length of your headboard when turned horizontally.
On our six panel door, the top two panels were small, but the other four were the same size, which meant that the door could be based on just these four panels by removing the top two panels. But you could easily use something like a five panel, two panel (perhaps for a king bed), or Christian door similar to the photos below. You just need to make sure your measurements work to ensure the symmetry around the center point.
4. Cut Door to Length
Once you've selected the door and know your measurements, lay the door on its side against a wall and mark the center point of the headboard. Then measure out of this center point to establish the cut lines on the door where you will need to trim the top and bottom. We recommend trimming both sides to ensure you have a good and square end on both sides of the headboard. This is important later when attaching the sides, or "posts," to the door.
We used a circular saw to cut the two ends off of the door. You can use a jigsaw as well, but make sure you use a guide to give you the best possible chance at a straight cut.
5. Make Your Plans
This may seem like it is a bit out of order and perhaps this step should come before cutting the door, but nonetheless, this is the order that we proceeded. (Not that we ever do anything out of order!)
Once the door was cut, we could better envision what the headboard would end up looking like. With this improved vision of our implementation, I was able to create a small sketch of plans for the headboard. This sketch would allow me to plan out the different pieces of wood and cuts that would be necessary. It would also allow me to make my shopping list for wood and other supplies.
As you can see, there's nothing overly technical about my plans. And, full disclosure, if you look really closely at the measurements, you may see that my math was off and the end results were actually different. Luckily for us, we were able to adjust our plan on the fly and still make it work.
For our plans, we decided that we would use the details from the inspiration headboards shown above. The side support pieces were an important aspect, as well as the shelf and crown details on the top. Rather than try to get large pieces of 4 x 4 wood and cutting them down for the sides, I decided we would fake it by using two pieces of 1 x 3 boards that wrapped around the door's ends. This would give the impression of a more substantial piece of wood on the edges, and would be far easier to find and less expensive.
For the top of the door, I used three individual pieces of wood. The first piece covers the top of the main middle section of the door between the end "support" pieces, while two smaller but wider pieces act as caps on the posts on either side of the narrower middle piece. I don't have an in-progress photo of this, so I created the following line sketch as a visual of what I just described.
This approach would allow the visually interesting detail of changing width along the top of the headboard, and a more intricate crown detail. The one major question I had was what kind of small crown detail would we use? We decided to leave that decision up to when we were shopping for the wood, though this would leave some lumber aisle calculations as a necessary additional step in the project.
The final important piece in your plan is to determine the proper height for the bottom of the headboard. This should be based on the height of the top of your mattress, but slightly shorter. You don't want to make it the same, or you will run the risk of your pillows falling into the void. And you don't want to make it too low, or you will not have a substantial enough reveal of the headboard above the bed. This is based on personal preference. In our project, we made it 24 3/16" for a 28" height on the bed, but realized that was too tall while building and had to cut off some of the support. I think the end result was around 22". Sometimes it's necessary to be flexible and make corrections mid-project.
6. Buy Your Wood
Your plans should be sufficient enough to create your shopping list. We purchased everything we needed from the lumber department of a home improvement store without much issue. I wanted to use poplar for the project, but unfortunately their lumber was picked over and they were out of 1 x 6 boards. As a result, I ended up using clear pine instead.
I mentioned that we had left the crown detail until shopping for the wood, so it was important that I brought my plans, a pen, and the tape measure with us on the trip. We went to the molding aisle and decided on a small 45 degree crown with a simple cove that is similar to the crown we've installed in many of the rooms upstairs. This crown required a 1 1/2" overhang, and I wanted to give it an additional 1/4" reveal. So my "on the fly" calculations let me determine the necessary width of the board for the top of the headboard.
We loaded up our cart and headed home with the spoils from our quest. All told, it ran us about $50, not including the extra piece of crown I purchased (and later returned). I tend to buy an extra piece when the cut will be close. I've been known to make horribly inaccurate cuts slight miscalculations from time to time, and would rather have an extra piece to return after we're finished, instead of making another trip for more wood mid-project if a mistake happens.
One of my favorite parts of woodworking and projects like this is setting all of the wood up, looking at it in its somewhat raw form, and knowing that in a couple of days it will be something totally different. It just makes me happy. I know, totally nerdy.
7. Assemble the Sides
Once you have all of your wood and you are ready to start working, the first step is to give yourself the rough frame of the headboard. Since there is probably a hole in the door for the knob, possibly a smaller one with a salvaged door, we put that side on the bottom of the headboard so that it would be hidden behind the bed. We opted not to fill it since it will be concealed by the mattress.
The other side of the door has the mortises for the hinges. Since the top of the headboard will have the shelf and crown, we didn't need to fill those either since they'll be covered.
We used two pieces of scrap wood we had in the basement. They were leftover pieces of 4/4 wood that I ripped to size on the table saw. If you don't heave easy access to a table saw, you can use 1 x 2s attached to either side of the door.
These pieces acted as the base for the "legs" of the headboard that we would eventually wrap other wood around. I affixed them with a hefty amount of wood glue and a bunch of pneumatic nails. I used our compressor and nailer on this, but you could just as easily use a hammer and nails, or even screws at this point. If you do use screws, make sure you still a pilot hole or your 1 x 2s may split.
Note: It was at this point that we realized the headboard was going to be too tall. We pushed the bed up to the headboard and could see that the hole would be visible and it would feel too tall in the room. Remember, small house, low ceiling, always making adjustments. But this was a good time to realize it. We were able to easily cut the base of the support pieces off. No harm done.
8. Assemble the "Posts"
Since we are faking the side posts that wrap around the supports, we will need to assemble them and attach them at this point. To do this I would use two pieces of 1 x 3 cut to length for each side.
I went down to the basement and put on my table saw's dado blade (blade used to cut channels in the wood) in a 3/4" configuration and set up the sacrificial fence (I've learned so much from watching Norm on New Yankee Workshop). This would allow me to cut a 3/4" wide dado at the edge of the face board that the side board would fit into. From the photo below you can see the board on the left that I made a test cut on, and the actual boards on the right together in a test fit.
Notice the blue clamps on the fence. Those things are awesome. I picked them up from Rockler and they make applying a sacrificial fence o-so-easy. After cutting the dados, the face board should easily accept the side pieces.
What I did may be a bit overkill, but it gives a solid and secure joint. If you don't have a dado blade, that's ok. You can just rip the side piece to be shorter and face nail the front to the side. This will make sure the seam of the joint stays on the side and not the front of the headboard.
In our case, before nailing the pieces together I knew that I wanted to cut the sides to fit around our baseboards. Since space is at a premium, we wanted the headboard to fit flush on the wall. To do this I scribed the leg to match the profile of the baseboard and shoe molding using a simple compass by setting the width of the compass to that of the largest gap between the wood and the wall. I then traced the profile of the baseboard with the compass set to the proper width.
Then I cut away the material that needed to be removed with my jigsaw. You can see from the photo above that the two pieces are not nailed together yet, but the joint will be barely noticeable once nailed, sanded, and painted.
To assemble the side pieces I simply glued up the dado, clamped the two boards, and shot some 1 1/4" brad nails into it, roughly one every 8" to 10", and then let it set up for a couple of hours.
9. Attach the Support Posts
Once the post's glue has set up, you can attach the posts to the headboard. Again, I glued and nailed the boxes I created to the edges of the headboard's supports I installed in an earlier step. For this, I used 2 1/2" finish nails shot in from the side. I then used some additional 1 1/4" brad nails to nail the face of the posts to the door.
10. Attach the Shelf and Crown
With the sides assembled, you can place the boards on the top of the door. The plans we drew up allowed us to place the 1 x 4 pine directly on with no need to rip it. As I mentioned, we used slightly larger pieces for the tops of the two posts. We were able to just cut these on the miter saw. Again, I glued and then nailed the top with 1 1/4" brad nails.
The crown was nice and easy. Unlike the rest of the house, all of the angles on these project were 45 degrees, so I just set the miter saw to 45 degrees and cut each piece. I didn't even bother using the compound angles, since this crown was so small I just had to prop it up against the normal miter fence and cut. For most of the pieces, I used a small 3/4" brad nail to affix the crown, and for the really tiny pieces I just used wood glue and put a small piece of painters tape on it until the glue dried. If I had tried to nail the small pieces they would have broken for sure.
11. Test Fit
Assembly of the headboard was pretty easy, but before moving on, make sure it fits the way you want it to. This is the last step where you will be able to make any necessary adjustments before you will make your paint job suffer for any mistakes.
Drum roll please. Test fit is perfect! So we move on to the next step.
12. Wood Filler and Paint Prep
You probably have a lot of different surfaces here, and a lot of nail holes, so don't skimp on the paint prep. This is easily the place where most otherwise great projects suffer from impatience.
First, fill all of your nail holes with a good quality non-shrinking and paint-able wood filler. You can use a two part epoxy if you want, but for this I just used one of the "premium" Elmer's fillers that I used throughout the house on molding. It stands easily but doesn't typically shrink much.
Make sure you fill all of the holes and have someone check over your work too. I don't know how many times I think I've filled everything, only to find one or two I've missed during the paint stage of a project.
Once all of the holes are filled and the filler has dried, it is sanding time. I like to use my orbital sander on all of the large flat pieces, starting with a 120 Grit, then moving to either 180 or 220, and some '0' steel wool on the crazy angles, followed by '00'. Then I typically use on the of the soft 220 grit sanding sponges to go over everything one last time.
13. Paint
We were just doing our normal white trim color on this project, so paint was pretty straight forward. We took the door to a fairly dust free portion of our house, applied a coat of primer, and two coats of paint. All in all, it was looking good.
14. Place and Secure
If everything has gone smoothly you should be able to place the headboard in your room about 24 hours after applying your second coat of paint.
In our situation, the headboard is actually held against the wall by the bed. We plan on affixing some adhesive velcro to the back of the headboard and to the wall to hold it a bit more securely down the line.
If your headboard needs to be put in place so it absolutely can't move, you can either drill through the base of the headboard behind the bed and secure it to studs in the wall, or even place a cleat on the wall that the headboard can rest on and be attached to. There are quite a few viable options.
Note from Wendy: I just want to point out that Alex went a bit overboard on this project (which is typical), and that this level of complication probably isn't suitable to the beginner DIY enthusiast. Alternate option: consider eliminating the construction of the posts altogether (steps 7-9) so that the headboard is comprised of the door and crown detail alone. Affix the door to the wall as he mentioned above, either by screws or cleat.
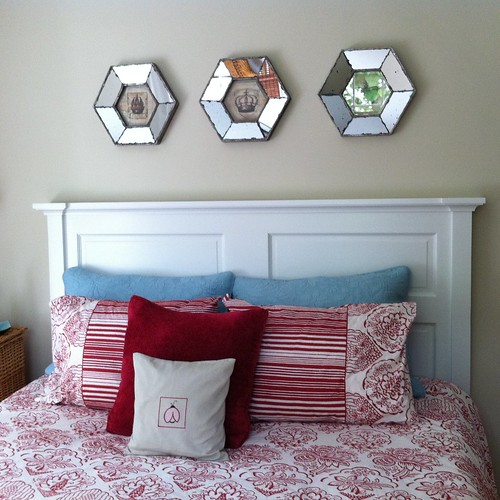
15. Enjoy and Accessorize
No project is complete without enjoying the fruits of your labor. And, as my better half has has taught me, no project is complete without the proper accessories.
As it turned out, moving and tripping over this door for several years turned out to be worth the hassle. (Even if we did feel like hoarders on occasion for keeping an old door "just in case we think of something to use it for.") We're quite happy with the final look, the final cost (around $50), and how it fits in the room. I'd say we're also just as happy that we didn't end up sending a door to the landfill whose only flaw was that it didn't look right in our home.
Do you have the same need to save and reuse as much as possible? Perhaps a cool re-purpose project of your own? If you do, please share.