"Just because something doesn't look quite the way you want doesn't mean you have to live with it."
This should be a DIY mantra of some sort, perhaps tattooed across a self respecting handy person's calf or shoulder blade. I can see it now, there's no way I would regret a tattoo as legit as that in a prominent location on my body.
Several months ago we shared our lucky find of an outdoor dining table that we stumbled on at Lucketts Antiques. This beauty was hidden under several other items stacked up on the store's porch. So when we pulled the trigger on the purchase, we were aware that there had been a fair amount of damage to the table's surface from its time on the porch.
The finish on the table top was a simple stain topped with an oil based poly. The poly was applied pretty thick, but was pretty heavily scratched in a few areas, there were several large sections where the first coat of poly had peeled up and a top coat was applied to cover the missing section, as well as a few places that had missing poly altogether. It looked good from a distance, but up close it had obviously see better days...and not in a cool character building way.
Since we'd originally planned on building our table out of reclaimed lumber, taking the tradeoff of refinishing the top versus building the whole thing from scratch seemed like a good compromise. (Plus Wendy was able to negotiate a better price on the table due to the damaged finish.)
After starting the summer by enjoying several great dinners with friends on this table...
...including a mallet flying frenzy of blue crab smashing, we decided it was time to refinish the table top to ready the surface in anticipation of many more crab feasts.
In order to get this part started, we'd need to completely sand the entire table down to bare wood.
The surface scratches were really deep in places, there were big changes in the height where some boards joined, and the end boards overlapped the edges of the table pretty significantly and needed to be sanded flush.
As I started sanding I realized just how splotchy the surface would be if I didn't really get all of the stain off of the boards. I started with a heavy 40 grit paper to really cut through all of the poly and scratches.
I continued sanding for a few more hours working my up through the grits. 40, 80, 120, 150, until the whole table started to assume a good consistent color.
As I sanded I noticed two things. First, I could barely feel my hands after all of the sanding due to the vibration. My fingers all felt like they were buzzing for over 36 hours after I was done. And second, the 4th board on the table looked to be heart pine while the other three boards were likely an older growth fir or some other light wood species.
When all was sanded and done we had a great looking table just waiting for a finish. A finish, mind you, that I'd been obsessing about choosing since we purchased the table several months ago.
After doing a lot of research (and I mean a LOT) on the ideal surface finish for this 100% outdoor table, we decided on the tried and true Waterlox Marine Sealer and Satin Finish combination. This finish appealed to us since it's a proven (around since 1910) tung oil based finish, is meant for outdoor use, and can be exposed to the elements. It's not plastic-y like poly, can withstand the abuse often inflicted when pounding crab shells with mallets, and simply needs a periodic refresh every few years if the wear and tear is too much.
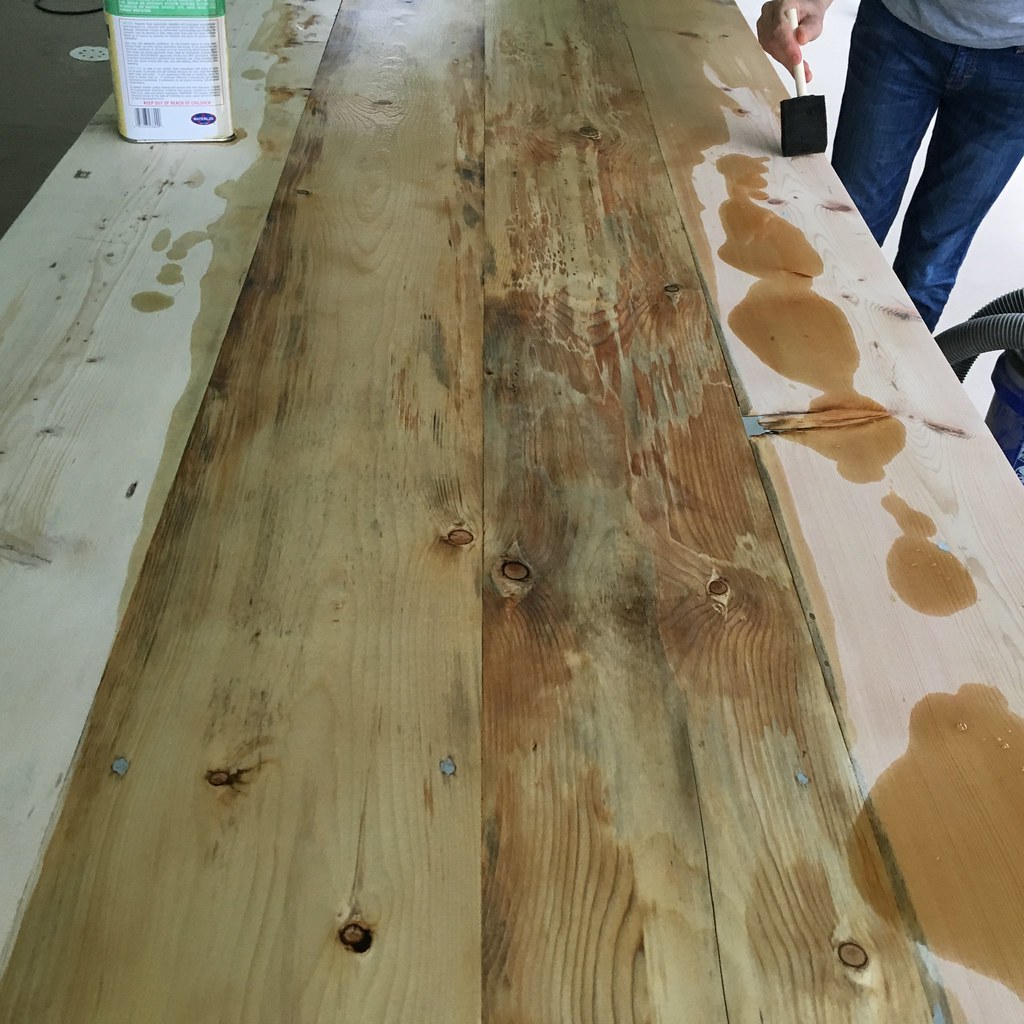
We started our finish process with a can of the Waterlox medium sheen Marine Sealer .
.
This sealer acts as a tung oil primer for the finish coat that will be applied. The thirsty wood will drank up two thick coats of this sealer in preparation for the finish coat.
Using a few foam brushes we applied the sealer very liberally but could quickly see where the wood was really soaking it up.
After allowing the first coat to dry sufficiently I hand sanded the slightly rough surface with 220 grit paper. This is an optional step done purely for aesthetics, but one I felt was necessary since the sealer does seem to "fuzz" up the surface a bit.
We applied the second and noticed that the thirsty parts of the wood seamed to be sucking the tung oil up much more regularly. So it would seem the sealer was doing it's job.
Dry time with Waterlox requires 24 hours before a next coat can be applied. I'll tell you one thing for sure, it's agonizing to wait, but it is necessary.
To finish off the table we opted for Waterlox Satin Marine Finish as the top coat. Unlike the sealer, which acts as the primer, the finish coat is meant to build up the surface to protect it. It creates a very lovely surface with a subtle sheen, and a slight amber color.
Application of the finish coat is very straight forward. I used a natural bristle brush and quickly worked over the whole surface to apply and smooth the finish, leaving as few brush and stop marks as I could.
The finish coat, like the sealer, requires two coats with 24 hours dry time between. I set up a fan nearby since it was so hot and humid out when we were applying the finish coat, as I just wanted to try to get air moving across the surface to help it cure.
Within a few hours the gloss of the finish coat fades as the surface starts the curing process. We're both really happy with how the new table top surface ended up looking after a complete sanding and application of Waterlox. The large poly fracturing scratches and missing sections are gone and it's ready for us to start adding our own character. And as agonizing as it was waiting for the surface to cure, we used the opportunity to adorn the porch with a few bunting to celebrate Independence Day (an the month of July in general).
As it continues to shape up, the porch is quickly becoming one of our favorite "rooms" of the house. Now that the table is sanded and finished we're surely going to be spending quite a few nights out there eating crabs and enjoying the company of great friends and family. Well, that is if we can get better at catching crabs. Last try we ended up with only a single crab that we mercifully released back into the wild.
We have big plans for this outdoor space, including a plan to build a few smaller tables. But until we get to that point, we now have a beautiful and refinished outdoor dining table that looks just how we'd like it to.
Have you used Waterlox on any of your projects? What are you thoughts on the finish? Like it, hate it, swear by it? Would love to hear your experience.