It's been months in the making and we finally have a functional and (nearly) complete first floor bathroom!
This little bathroom that started out completely covered in floral wallpaper with a floral border, with baseboard radiators, cracked and scratched tile, missing a mirror, and with an off center pedestal sink...
...has been completely transformed.
This room was the very first project we launched into to spruce up our new home. We wanted to tackle something small, something quick, and something that may not be a complete renovation of the bathroom, but would make it feel a whole lot nicer than it did at first.
Little did we know that our plans would be derailed and we'd go through what amounted to three mini projects in this one bathroom over about a year and a half.
The first step was the wallpaper removal, skim coating and first coats of paint in November 2014.
The room was looking good at this point, and we felt ready to move on.
But after the pipes froze and we had to remove the baseboard radiators and re-plumb the bathroom, we ended up getting really up close and personal with our home. We learned there was hardwood floor under the dingy tile, and shiplap behind the drywall, and we felt both needed to be exposed.
We also built a custom vanity top from butcher block to replace the old pedestal sink, and of course a little more painting. This was circa November 2015, one full year after the initial updates.
Finally (or at least most recently), step three, tile floor removal, patching in the drywall from the removed radiators, repairing and refinishing the heart pine floor, and more painting.
During our last update I mentioned using the custom replicated molding to match this room's baseboard with the rest of the house. After installing it all, priming, and painting (Benjamin Moore White Dove), it was time to install the room's shoe molding.
The shoe molding had several intricate cuts to properly fit the room, but with a little time a patience, we had it looking pretty good in even the most odd of configurations.
We like to paint the shoe molding before nailing it in place, and then we just wood fill the nail hole and caulk the top gap. This makes it much easier to paint without getting paint all over the floor or needing to worry about taping.
Finally, we just had to paint the walls...again...Benjamin Moore Wales Gray.
We had reached what I thought was the end. Just had to pop the new toilet back in place and call it done, but the fact that the wall has a layer of drywall on it over the shiplap, and the fact the baseboard and shoe molding protrude even a little further then normal, and the fact that the toilet we chose (Kohler Memoirs) extends quite far back towards the wall at the base, we were faced with a situation.
The shoe molding was a little too deep and the toilet was sitting right on the shoe molding when it was in place, unable to sit down on the floor properly. Well...crap.
To remedy this, um...crappy situation, I traced the outline of the back of the toilet and started shaving away bits of the shoe molding using my utility knife. I wish I had my chisels with me, but this utility knife with a nice sharp blade had to work.
After quite a bit of shaving to get the curve just right, I painted the newly exposed wood and placed the toilet back in it's home. Fingers crossed, I forced the bowl down in its permanent home and saw that the newly carved relief in the shoe molding was a perfect fit.
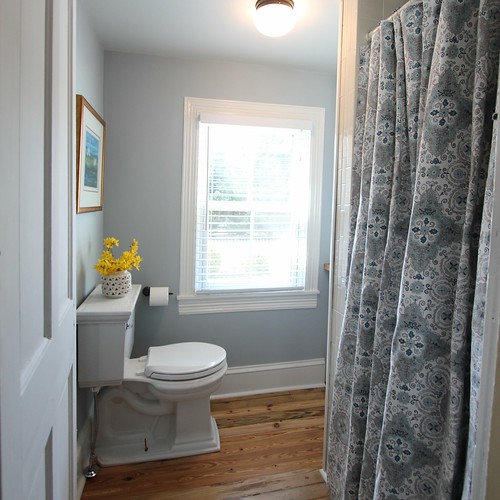
While the bathroom is nearly fully functional, we still have two more projects to take care of in this room. Below the butcher block vanity we're going to build a cabinet front that will allow the space to function as an actual vanity with storage. This will allow us to store bathroom essentials in the room that has no other storage. But given the tight space and odd size, this cabinet front will need to be built right in. We also need to restore the original rim lock and hardware on the door and reinstall it so the door functions as one might expect a door to function.
We also still need to bolt the toilet down. I somehow misplaced the plastic washers we need to secure the toilet so I had to order a replacement of the $3 part for install later. But don't worry about the bolts, doesn't the floor look great?!
But other than all of that, we're basically "done." Okay, maybe not done, but boy, look at that floor. Sure, there are a few rough spots but that's just character to show the adventure this floor has been on for the last 100 years. We absolutely love how it turned out. And the molding in this room looks like it's been here the whole time, minus the 40 layers of thick paint.
As I mentioned above, we still have a few outstanding items to take care of in this room. But this is really becoming a room we're happy with, and it gives us hope and encouragement for projects to come. We can't wait to finish this up and share the final vanity look once it's all done.