Do you remember way back when we were renovating our master bathroom?
And do you remember when we finished it? No? Yeah, neither do we, because it's still not finished, no matter how great we think it looks in some photos. We have blog posts on our master bathroom going back to March, 2012!!!
If you've been hanging around this blog for a while, this post topic may seem a bit familiar. About this time last year our bathroom was fully functional, but not 100% complete. We still had a few checklist items to take care of (like a closet door, a little trim, a window restoration), and one, well, make that two major pieces left.
More specifically, we needed to build the two large storage cabinet bases that would ultimately live on either side of our converted antique vanity. Look at how alone it looked on that big wall with nothing accompanying it.
Last year I started this project with every intention of knocking it out in a few weeks. Initial work started fast and furious and before we knew it we had two nearly completed yet very unfinished cabinet bases. Though we started fast, before we knew it progress on these two cabinets stalled. It's such a total cop out to say it, but it feels like everything got in the way. Other projects, work, life, desire, general lethargy, and some amazing ability to see right past the fact that there were two partially finished cabinets flanking our vanity.
There they sat. Lonely, unfinished, motionless, partially built, screaming out for someone to come along and pick up where we'd left off and turn these shells into something worthwhile. There may have even been threats that they would be scrapped and something would be purchased rather than waiting for these cabinets to magically finish themselves. Instead, while we worked on other things all over the place, we neglected these little unfinished cabinets...until recently.
After nearly a year of a lack of construction activity, enough was enough. We picked up the work on the base by adding some baseboard. We had debated about whether we wanted the base of the cabinets to be open, like the vanity, or closed, more like the baseboards of the room. Since we're borrowing features from both the room and the vanity, and we don't want the cabinets to look just like the vanity, we decided to go with what was ultimately the more simple route and make them closed.
Before we build the doors and drawers for the cabinets I want to get the whole cabinet body finished. This means the next step in our cabinet build will be on the upper cabinet sections. So far we've been focusing on the closed lowers, but the plan for the upper cabinets is to build a shallower component that will sit atop the lowers, and will be fitted with adjustable shelves and two glass front doors.
However, these upper cabinets will need to run past the beadboard cap (which we covered at legnth back in December, 2013) that protrudes rather significantly from the wall. We didn't want to interrupt the molding in the event someone wants to get rid of these cabinets in the future, so we have to build the cabinets to wrap around the molding. I started by duplicating the molding profile with my Contour Gauge Duplicator .
.
I then traced the contour onto the wood I'd cut for the cabinet sides.
Using my jigsaw (though a coping saw would have worked fine but taken a little longer), I carefully cut out the profile of the molding so the upper cabinet can sit back agains the wall while and will fit around the molding.
A quick test fit of the first piece told me we were well on our way to upper cabinets.
I'm building these upper cabinets as a second piece to the overall cabinet. This will allow me to assemble everything in multiple pieces, and screw them all together at the time of final assembly. This also means that I can build each component in the basement without worry of how we'll get the giant thing up the stairs.
Though I STILL need to clean up our basement, I was able to make myself a small assemble space with some plywood and saw horses. All of the cuts are dado grooves or rabbet joints, so the whole thing more or less locks together. So I just need to glue the joints, fit everything in place, and then shoot in a few brad nails to hold it all in place while the glue sets.
All of the wood I'm using for this project is stock pine from Lowe's. I'm doing this, rather than using much plywood, to give these cabinets a bit of an older look to them. I want them to look like they've been in the bathroom for over 100 years. This is also a good excuse to make these cabinets look a little bit primitive in their construction.
The face may look nice and proper with their little bead around the doors, but the interior back will have little gaps between boards and lines visible. It will look hand made, especially when painted, which is exactly what I was hoping for.
One annoying thing about how we're building these is that we have to keep taking them upstairs and down for test fits and assembly. While the individual cabinet pieces are not particularly heavy, they are awkward and require two people to drag them up and down the basement stairs. Here's my partner in crime helping me navigate our tricky stairwell.
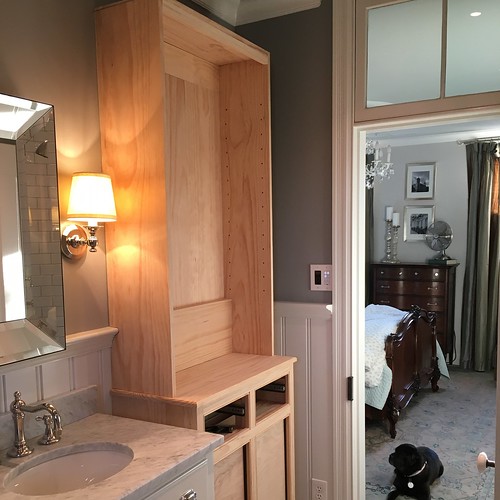
Once we got the shell upstairs and into place it fit almost perfectly! (You can see just how excited Lulu is by this.)
I wrapped the interior of the upper cabinet around the molding, giving it a sort of ledge. This will let the interior back of the cabinet look normal rather than having the molding run through the inside of the cabinet. Also, you can see from the next photo what I was talking about with the minor inconsistency on the back panel. Once we have divided light doors with salvaged glass and it's all painted, it should look awesome.
Rather than assembling everything with a piece of plywood or mdf/masonite (think Ikea cabinets) nailed to the back, I fitted the backs with three full 3/4" thickness pine boards. This is a much more traditional approach to cabinet making and gives it a look of a much older piece. I'm still figuring out exactly how I want to handle the top piece. Right now it's just set in place as I think we may do interior lighting that will sit in a recessed area. We'll see exactly how that shakes out.
As I've cut and assembled I've always made up two of every piece for the twin cabinet on the other side. This has helped the assembly move along at a nice pace without the need to constantly recreate what I'd just done. I basically cut and build one cabinet while placing all of the pieces for the second in a pile. Then when the first cabinet's glue is drying, I assemble the other one. It's a good process and I can get in the rhythm.
Now that the two shells are done, the next steps for this project will involve the upper cabinet face frames and small crown detail we'll do at the very top of each cabinet. We'll be able to assemble everything with about a dozen screws that will be totally hidden from view, and we'll also secure the cabinets to studs in the wall to ensure they don't tip. Finally, we'll build the drawers, door fronts, and upper doors before painting everything.
I'm excited to be working on these cabinets again. The way the light bounces off of the cabinet sides and how these pieces fit in the room feel very natural and collected, which is exactly what we're going for. As much as I'm enjoying woodworking again, I do have to say that I'm frustrated beyond belief at the lack of space in the basement to do large furniture like this, and am often jealous of people with large garage wood shops. The whole time I'm working in the basement I'm also scheming about how we might be able to dig out a larger section to free up a little space for more wood working space. But maybe I could just finish a bunch of our half completed projects so I can just get more of the crap out of our basement? That's an idea.
What do you think of the progress so far?