While it may feel like we're starting project after project and not really ever finishing anything, in reality, that's EXACTLY what we are doing!!!
Our project list is a mile long and growing. Right now we've got:
- An as yet incomplete master bathroom,
- A still in progress storm window build (yes, still),
- Clean the basement/Remove oil drum
- An in progress quick bathroom fix up,
- A major load bearing wall removal,
- And a million little projects here and there that we want to tackle (yes, figuratively a million).
While I likely have a good excuse or nine for why each project isn't further along, I won't bore you with made up lies and convoluted stories of how we got to where we are. But I will say, in the words of SNL's Classic character, Middle Aged Man, "Hey, I'm working on it!"
Instead, why don't we tackle a decidedly more bite sized project that will allow us to not only start and finish a project rather quickly, but also check something off of a list that seems to be growing at a pace that I'm beginning to get uncomfortable with.
When we bought our house on the water, we had a home inspection like most people buying a new home. The inspector said many wonderful things about the house, including the fact that it "had good karma." Now if that's not a glowing endorsement from a person in a trade that is more often associated with doom and gloom than rainbows and unicorns, I don't know what is.
Among the various topics covered on inspection day we went out and walked our dock with the inspector. While many of the home-related items were familiar to us as DIYers and homeowners, the idea of a dock and what's needed to maintain them is about as foreign as it comes. We're water noobs, and though I'm confident we can learn, it won't be without effort. And this is important, because we have some waterfront to deal with.
The good news about the home inspection dock review, it's in pretty great shape having been completely rebuilt in the not too distant past. Some of the boards have begun to weather a bit due to the brackish water and salt air, but that's easily corrected with a new board or by flipping the existing board.
More importantly, the pilings are all in relatively good shape. They're all large, straight, and none show any signs of cracking or other issues.
The one item our inspector did mention had to do with weathering the tops of the pilings were beginning to experience.
From years of rain, snow, and spray soaking the tops of the pilings, the more vulnerable center core of the pilings can rot from the center out, undermining the structure of the pilings well before their typical useful life.
However, resolving this is as simple as applying a piling cap to the top of each piling to help shed water and keep debris (like bird poop) from resting on the tops of the pilings and eating away at the wood.
After doing a bit of research I realized there are only a few options when it comes to piling caps. Essentially, there are colored plastic piling caps and metal (copper) piling caps. And there are flat piling caps and pointed piling caps. That about sums it up, unless you want to get super fancy and install piling caps with built in solar lights.
There are advantages and disadvantages to each option. While the copper looks the nicest and will last the longest (50 years or more), it's also the most expensive and most likely to be stolen by...pirates I guess? I know about copper pirates, trust me.
When looking at the plastic options, the flat ones are more attractive, but birds tend to sit on those and leave lots of poop for you to constantly clean up. The pointed ones discourage the use as an avian port-o-potty and also prevents any standing water from pooling on the top, which can shorten the cap's life.
Finally, with the plastic caps, you need to decide on a color, typically either white or black. The black can last longer, but white shows less bird poop and I imagine they don't get as hot when summertime sun beats down on them all day long. Also, the black tends to cost just a tiny bit more.
After reviewing all of our various options, while I so badly wanted to buy all copper caps and watch them slowly patina to a spectacularly dull green, it just didn't make sense. Instead we decided on the pointed white plastic, feeling it would look the nicest while also remaining the most practical.
To prepare for this project I walked up and down the dock measuring the widest diameter of each and every piling and recording my results in order. To keep them all straight I started with the front right and worked my way clockwise around the dock.
This recording step is an important part of the process as each piling of ours is just a little different size. Of our 26 pilings we'll need to cap, we were looking at anywhere from an 8.5" diameter to a 10". With my measurements in hand I found a well priced store online called American Muscle Docks that offered caps in 1/2 inch increments, and I placed our order for all of the various sizes we'd need.
A few days later all of the caps arrived in a large box and we got to work putting them on the dock.
I was working with Wendy's Dad on the project while Wendy stayed inside on crutches, recovering from hip surgery and taking photos of us. The extra set of hands helped move the whole thing along quite substantially. We first arranged the caps by size while inside to ensure we'd have everything we needed. It was a cold day out and we didn't want to spend any more time than needed on the windy dock. (On a side note, you can see Wendy's been busy with living room design, and purchased the sisal and chenille rug seen underneath the piling caps. It's in the dining room for the time being.)
After compiling our list and order of measurements for the pilings, we headed outside. Wendy's dad worked to determine the location for each cap based on the sizing and placed each one on the piling.
I then followed behind with my drill and 1-1/4" exterior decking screws suitable for pressure treated lumber.
Lulu also followed along to be sure all of the work was being completed within acceptable parameters.
I methodically worked my way down the dock making sure each cap was square to the piling, and placing 3 screws on the side of the cap in a triangular pattern. This pattern helps to ensure good hold without causing wrinkling or puckering.
The whole thing probably only took about an hour, and most of the time I was singing Devo songs in my head and thinking about wearing the piling caps (Whip It Good!).
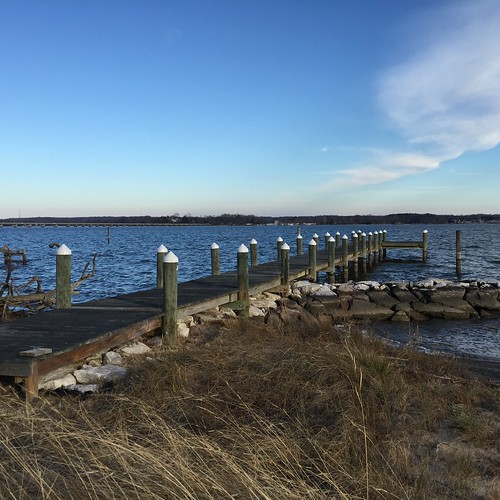
When all was said and done our 26 beautiful (yes, we're calling them that) white piling caps protecting the delicate innards of our pilings.
More importantly, we actually checked an item off of our to do list and can feel particularly good about that. I'm not sure what we'll do with the two taller pilings set out from the dock a bit. But since we don't have a boat, this is good enough for what we need.
I do think we've already seen at least one visitor that's not too happy with our decision. He sat in that same spot of protest for several hours.
So, for all of you water life experts out there, what else should we look at to extend the life of the dock and maintain it for years to come? Please let me know, because I'm all ears. (Literally, my ears are huge.)