Several months ago, after receiving an antique dresser my parents were looking to get rid of, we told you about our plans to paint it and put it in our bathroom closet. I mean, what kind of bloggers would we be if we weren't looking to slather some antique never-been-painted piece of furniture in layer after layer of streaky paint? Hell, we might as well go ahead and use milk paint...and then distress it by hitting it with chains and stuff.
Well, to be totally honest, the idea of painting this piece of antique furniture never really sat well with me. Now, I knew Wendy wanted to paint it, but the thing is, this is going to be my dresser. Also, once we let our intentions be known on the blog, several commenters also mentioned it might be a shame to paint this piece.
Armed with my personal preference, I made my case.
- It's not a particularly nice piece, but it is oak, and oak tends to not paint very well due to its massive and pronounced grain.
- It's old, antique even, and it's never been painted, so why start now?
- I'm going to be the one using it, so shouldn't my vote count? (Shouldn't it? Probably not.)
- I really didn't like the color, so I had an idea of how to change it and have it look good. But if it still didn't look good, we could always paint later.
I don't know what happened next. Maybe the planets were in some weird feng shui configuration and the flying monkeys were distracted, but after some very animated hand waving, lots of loud words, and a blur of emotions that I seem to recall causing each of us to break down in tears multiple times, Wendy agreed to give it a shot.
Well, maybe Wendy actually just said, "Okay, sounds good," but I can't believe it was really that easy.
Armed with a wing and a payer, we got started with a whole lot of sanding. Wendy kicked off the festivities by removing the top of the dresser along with all of the hardware from the drawers, including the little brass key hole covers.
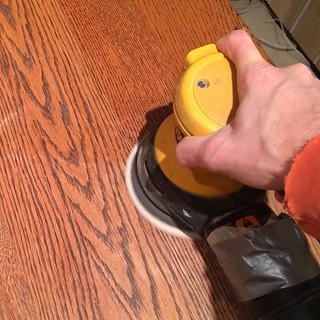
Once the drawers were free of their unattractive brass stamped handles (they were reproductions of poor quality), Wendy started in with the random orbit sander with the simple goal of sanding off all of the poly and stain from the fronts, tops, and bottoms of the drawers.
Here's a little secret about Wendy, she HATES sanding. She hates sanding with a passion. I'd say that sanding is easily her most hated piece of any house project. I'd almost to go as far as to say that Wendy hates sanding more than just about anything else, more than giving me my way, more than taking four years to complete a bathroom renovation, more than spending our 10th anniversary at a Nationals playoff game, more than snakes...well, no, not more than snakes. Actually, she hates snakes the most, way more than sanding.
While Wendy sanded away on the drawers, knowing her general contempt for the tedium of sanding anything more than simple flat pieces of wood, I took to sanding the more intricate elements of the dresser's body. I had to use a combination of steel wool, folded paper, the Fein oscillating tool, and good old elbow grease.
I have to be honest. I'd be remiss if I didn't mention that Wendy did end up bringing the sander up once she went through the grits on her drawers and started sanding out some of the larger elements of the body, but she didn't do it without giving me the evil eye.
After what felt like months of sanding (it actually only took a few days) we had ourselves a completely sanded and ready for staining cabinet body. We ended up going up through the grits of sandpaper, starting with 80, then to 120, 180, and finally, 220. All told, we probably spent a total of about 4-5 hours sanding. I didn't want to give Wendy a chance to reconsider her stance on painting, so I powered on with the project.
Since this dresser is going into our closet, the same closet where we used salvaged pine flooring as the wall treatment, I decided to give it a little test run so that I could close and open my eyes repeatedly and very quickly while attempting to imagine what it will all look like finished.
Give it a shot. It's like Photoshop, but in your brain. Make sure you use the brain stain filter and not the brain milk paint overlay.
The thing about this closet, we pretty much have no wiggle room around this dresser. The dresser fits almost perfectly, but the top, well, yeah...Not. So. Much.
Besides the dresser top's width issues, we had something else to deal with. One thing that neither of us ever liked about this dresser was the traditional wavy design on the dresser top's front edge. The front of it was cut in a traditional wave design similar to our bedroom's dresser.
But unlike our bedroom's dresser, the design didn't mimic the drawer fronts as those are just flat. It seems like it should be both or neither.
To remedy both of these issues, I took the dresser top to the unflinching and unapologetic blade of our table saw. I was playing for keeps. There would be no turning back once I ran it through the precision cutting disc.
My plan included not just cutting the offending design detail off of the front of the dresser top, but I also planned to add a new and more substantial decorative element to the front of the dresser's top by way of the router. And since there were actually two layers of dresser top, as you can see from this photo right after Wendy removed the top...
...I decided to put a nice round-over on the upper section, and a quarter round on the lower section.
All told, the modifications we decided on made the whole thing look much nicer, and the top ended up fitting perfectly in the closet. The only think left to do before we got to staining was sanding down the top. By this point in the sanding project, all sanding duties had officially been handed over to me.
But the question is, do you think we actually got to the staining part of this project, or do you think Wendy had a change of heart and brought home a nice can of super flat gray milk paint and grain filler so we could paint up this dresser once and for all? Perhaps she's tried to convince me to paint an ombre or chevron technique?
We'll fill you in on our next and very fateful steps in this project in our next post, but let me warn you, there is still a lot of compromise left in this dresser tale.