Last week we began outlining the somewhat long but very effective process we use to ensure our home's original plaster walls are both able to remain intact and assume a look more becoming of typical walls and ceilings. You know, smooth, without cracks, and not attempting to fall to the floor at any moment.
Our first step establishes a means to secure and stabilize the plaster, especially significantly damaged sections, by placing plaster buttons at critical points throughout the plaster, not just where there are visible problems.
The second step places a base coat of mud on the walls, along with an embedded layer of fiberglass screen to act as an isolation membrane. The goal of this step is simple. It's meant to provide a stable and sound base for additional skim coats, while separating the ultimate top coats from any minor movement the base of the plaster might experience.
Before we go on its important to take a quick look at how old horse hair and similar style plaster was laid. This will give a better understanding of why our process for plaster correction actually works quite well.
If you've never seen a dissected plaster wall before, its contents are fairly basic. The first layer consists of a wood (or metal in "newer" buildings) lath system. The lath is a collection of thin wood pieces spaced at roughly 1/2" gaps, is nailed to the framing members of the wall before plaster is applied to the walls, and is meant to support and anchor the plaster once it's been applied. Lath often has a very interesting and rustic look, and the older it is, the more roughly cut and irregular it will appear.
Next comes the scratch and brown coats of plaster. These layers are the often brown (especially in older homes and our home) and typically gritty/sandy layer of plaster applied prior to the finish coat. It's thick, not completely smooth, and is often made with a strengthening additive (like human or horse hair or even hay and grasses) to bond it all together, but over time it becomes very brittle on its own.
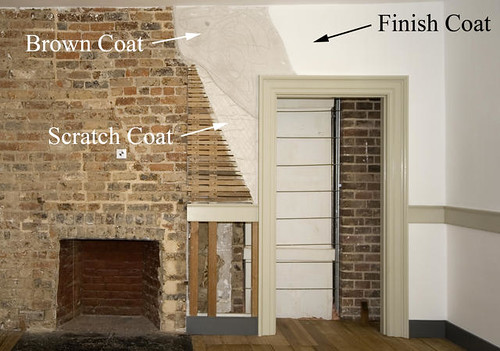
Photo Credit: Digital Montpelier
It is applied quite thick and in a large quantity using guide boards attached to the wall, and as it's applied it oozes through the gaps in the lath, making the plaster's "keys" as it hardens and locks it in place. No matter how irregular or out of square the room's framing is, good guide boards allow for a smooth wall since the brown coat can accommodate most variations.
Often, when wallpaper was being applied to a room's plaster, the brown coat was the final coat, as there was no reason for the finish coat. But the whole point of the lath and brown coat were to give a viable and strong substrate to which the finish coat could be applied, while also allowing for some minor separation of the base coat from direct contact with the building's framing members. If any minor movement occurred, the separation of the finish coat of plaster from the house via the brown coat and lath was enough to keep some cracks from forming, but we've all seen enough plaster walls to know this only worked so well.
Interestingly enough, the finish coat of plaster is also the thinest and most fragile. Usually white in appearance, it's typically lime based and applied in several thin layers by a plasterer's trowel and can take days, or even months, to fully cure. Back in the day, some new homes would remain unpainted on the interior walls and ceilings for six months to a year to allow for a full cure and the right exterior temperature to foster a good finish paint job. Patience was apparently more readily available in ye olden times.
Our approach to skim coat plaster repair uses a very similar overall approach to the original plaster system, only on a much smaller/thinner scale.
Once the fiberglass screen is in place, you can sort of think of it as the lath layer, separating the compromised base plaster from the new layers of wall. The next layer would then be the thicker "brown coat," meant to fully cover the lath, or in our case, screen, but the end result is not particularly smooth.
Using the same Durabond setting type joint compound I used to apply the screen in the first step, I mix up a very large amount (usually it's about 3/4 of a full bag) and end up using it all up quite quickly.
When I mix up this batch of joint compound I tend to use a bit thicker of a mix than the first coat. I want to have more substance behind what I'm putting up as I trowel it on and smooth it out. I'd say this batch of compound most typically resembles the consistency of creamy peanut butter.
When up on the wall it can stand up on its own at almost any thickness, but can also be easily worked. It's very smooth but will not sag while it cures. And it's substantial enough to completely cover the screen and any wall irregularities without building up to be too thick.
Though I'm not trying to make the wall perfectly smooth, the smoother I can make the wall at this step the easier of a time I'll have a bit later in the process. Due to this fact I try to load up a rather huge amount on my trowel and I go with long smooth swipes to spread the compound. I don't use the more traditional hawk and other tools, probably because I sort of taught myself, but this works for me.
This process actually goes rather quickly. Long smooth strokes, not a lot of futzing, and a little but of careful work in the corners (so you're not slopping it everywhere), and you've got yourself a wall or ceiling!
Once I've reached about a 4' by 4' coverage area, and if I'm not feeling good about how smooth I've been making the coat, I grab my "Magic Trowel." I picked up this gem years ago in a paint store. It's got a stiff blade with a soft rubber squeegee-like area on the end. Using steady pressure and a consistent stroke I am able to knock down any irregularities and even out all that I've applied in that four foot area.
It's very important to use even and moderate pressure with this tool. If you go too heavy you gouge the wall, too light and you end up with a weird bumpy texture that you'll need to intensely sand later. It's sort of the Goldilocks of plaster tools. Here's what the bumps look like with too little pressure.
The other tip I can give when using this tool is the absolute need for a bucket of water and some rags/towels nearby. This tool will accumulate compound as you use it, and between sections this compound will harden a bit. The next time you attempt to smooth your wall you'll end up with the pattern of where the Magic Trowel has dried bits on it, which will no doubt infuriate you and encourage you to throw things and make make bad decisions.
This whole same step should also be followed when working on new drywall that you'd like to look more like plaster. Since drywall probably isn't cracked and crumbling (or if it is you need to replace it), you don't need to do the whole button and screen step. Instead just apply mesh to the seams and proceed right onto this cover coat of joint compound.
I'd say roughly 3/4 of a bag of joint compound covers a roughly 4' by 8' section of wall. But this is by far the thickest coat of the whole process and uses the most compound at any one time.
The main thing to remember is that you'll be applying successive coats to the surface to obtain the perfectly smooth surface you want, so don't continue to mess with the surface to get it super smooth at this step. I've learned that the more you mess with the surface the more bumps and irregularities you inadvertently add that you'll have to sand out and smooth over later.
Once this step in the process is complete the walls or ceilings you're working on will be starting to look like single pieces, rather than the fractured mess you likely started with. There's obviously still a fair amount to get done, but you should be feeling encouraged.
We'll cover the next step in the process in our next post on plaster repair, but here's a hint: It involves a step that can produce gigantic mess, but if you follow our lead, you'll be able to keep your space relatively clean.
What do you think? Does this seem like a doable endeavor so far? I'll be honest, I used to be totally intimidated by plaster and plaster repair, but I feel like we've got it down to a science now and like we can handle just about anything the gypsum gods can throw at us (knock on lath).
We have a whole series of plaster repair/skim coating posts you should check out if you like this or are trying to tackle the same thing. Here's the whole list for convenience:
- Plaster Repair for DIYers - No Need to Rip It Out
- Plaster Buttons to Fix Your Crumbling Ceiling
- Plaster Repair Part 2: Laying a New Brown Coat - this post
- How To Fix Plaster Like a Boss: Sand Baby Sand
- DIY Plaster Repair: We Finally Put the Skim in Skim Coat
- My Skim Coating Nickname is Mr. Smooth - The Tricks I Use to Earn It
- The Final Steps to Perfect Skim Coating
