We left off in our master bedroom dream closet recap with a basic closet frame in place and a whole lot of hope for what this drab space could some day become. We had already lived without functional closets for quite a while, so the anticipation of having his and her closets that could hold a decent amount of clothing could be compared to how a child feels the night before Christmas. 

When we started in our search for the ideal master bedroom closets, we looked through all of our various options. From closet system companies to options from Ikea and The Container Store, there were so many different directions we could head to create a solution. Though there are varying levels of quality in the solutions available from the various outlets, two things were very consistent:

  1. The cost was more than we wanted to spend.
  2. The systems couldn't maximize every inch of available space.

Our needs were relatively simple. We didn't have the ability to do a complex system of cabinets and drawers similar to what you see in large walk in closets. Instead with the space we had to work with, we wanted a his closet on the left, a hers closet on the right, and a hers shoe area in the middle. The closet interior needed to provide ample hanging space, including two levels in most along with some long, full length hanging space. And most importantly, we wanted it to look really nice.

Wendy and I came up with a plan. We'd make an attempt to build the closet from oak, stain it dark, and use large chrome bars and accents. Knowing it would be far more simple than just saying "I'd really like a dark stained oak closet," we launched into the project.

We starting the project by purchasing several sheets of oak plywood. The plan was to use this plywood as the majority of the surface elements of the closet, including the portion to turn the upper area into a storage area of its own. Due to the size of the room, and the size of the stairs opening, it was far easier to cut everything in the back yard and take the smaller pieces upstairs. This meant lots of trips in and out of the house carrying very large sheets of very heavy plywood.

I ended up cutting the upper shelf and the side support pieces first, which allowed me to begin leaning the various pieces in place. Leaning everything in place let us visualize what the space would ultimately look like, and more importantly, how it would function.

This let us move around the various pieces and establish where the long hanging portion would reside. We settled on a final layout that included a roughly two foot area for long hanging in the right closet, and the remainder of the closets would be a two bar configuration.

In order to allow for adjustable shoe storage in the center closet, I used my awesome adjustable shelf support jig to pre drill all of the holes before install. This greatly simplified the entire process and made the whole thing relatively effortless.

I know I'm completely over simplifying the process of building out the closet interiors. By no means was it an easy "just slap some boards up and call it a day" type of build. It involved hours of measure twice and cut once moments, weeks of effort, and over a dozen individual pieces that fit together in a series of dado, miter, rip, and rabbet cuts like a giant closet jigsaw puzzle. But the trickiest part was the fact that we had to dry fit everything in place, then take it all apart and stain it all before putting it all back together.

The whole closet build took us about two weeks to cut everything we needed, then another three days of staining. At the end of the process we had ourselves a large set of dark stained jigsaw puzzle pieces that would eventually form our closets.

We ended up using two coats of Jacobean stain followed by a few coats of polyurethane. After a thorough dry time I began the laborious process of complete closet assembly. As much as I had hoped the dry fit of the parts and pieces would have helped, the actuality of the situation left me with quite a few hours balancing things on my head and shimming things here and there to get a tight fit.

As much effort as it was, as the whole thing started to come together we could both sense we were nearing real and actual closets.

You can see how we intended the long hanging to be separate from the rest in the right closet from the photo above. In the next photo you can see a bit of a jog on the interior of the left closet's right side. Because we were building the shoe closet in front of the chimney bump out, we had to be a bit creative. In order to center our design in the room, we had to be a bit creative with our shelf configuration. Centering the doors meant a portion of the chimney would still reside in the closet on the left, and instead of let those few precious inches to go waste, I planned to do a series of shelves for shoes or shirts in this area.

With our closet in place and stained, we began the very long process of trimming, fitting, adjusting, and correcting our salvaged doors.

The whole process of adjusting the doors was easily one of the most difficult and laborious processes I've ever undertaken. Some doors needed to be squared, some lengthened, some shortened, and all modified in one way or another. We were using 3-1/2" cast iron salvaged lift off hinges for all of the doors and we were working the doors in with the custom trim we had cut to mimic our original profiles. In other words, even though the closets were all new, we were going to great lengths to make our closet wall look like it had always been there.

The most difficult aspect of the fitting was probably getting the two double doors to line up properly and all of the panels to fall at primarily the same level line across all five doors. Unfortunately, one of the two doors on the right closet were slightly warped, but otherwise, all was in pretty great shape!

I won't bore you with the details of painting the doors, because, who wants to see yet another post about painting doors, but the end result of our efforts were rather gratifying. 


Sorry for the dark photo - this was taken during old iPhone days

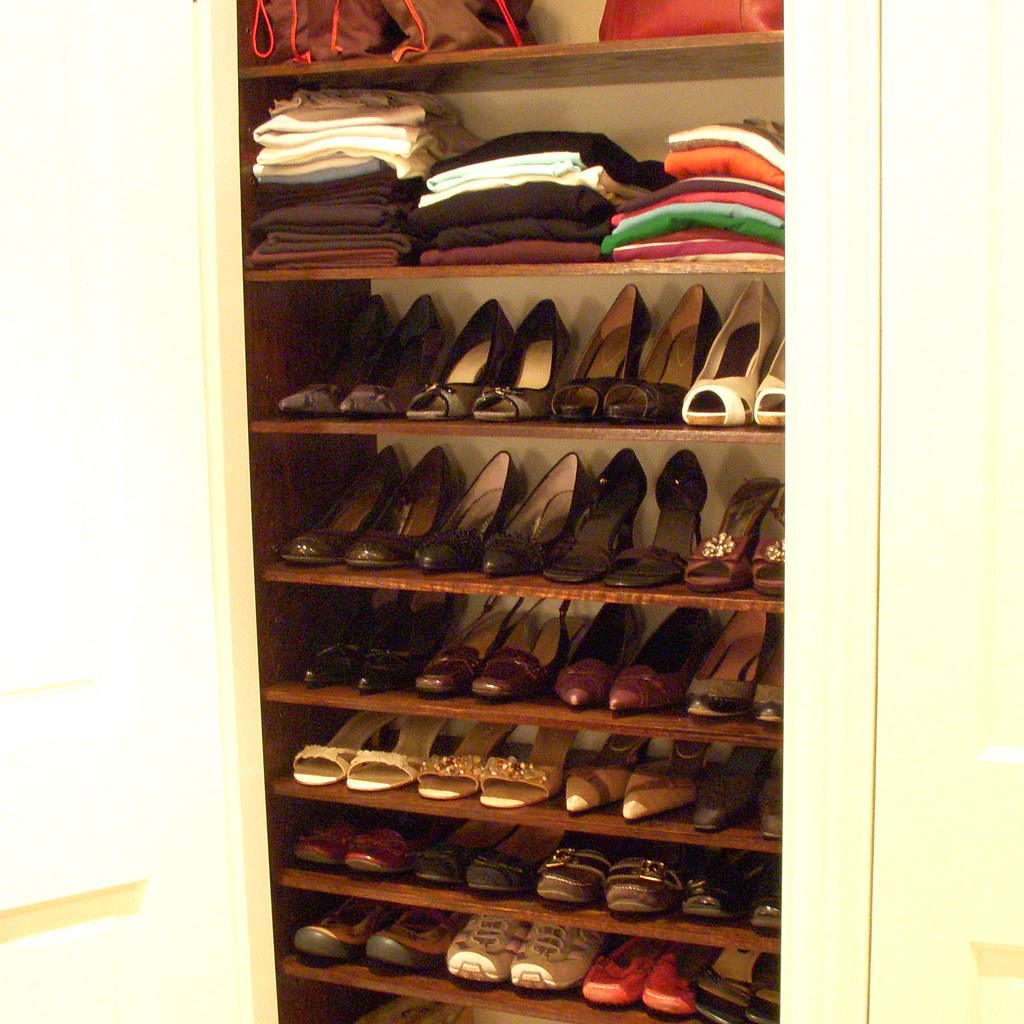
As you can see, Wendy got her shoe closet. It's her pride and joy of the bedroom, and sometimes I just see her opening the door to look at the wonderfully organized space.

In addition to her shoe storage, she also has her double bar and long hanging storage in the right closet.

And I'm left with my closet on the left, complete with shelf storage for all of my shirts and sweaters.

It's hard to believe that this is the space we were starting with.

The hope is to eventually add additional storage for clothes in a small closet that's in the bathroom, but for now, these are the dream closets that we had wanted for quite some time. Total cost of our entire interior closet makeover including wood, chrome closet bars from BuyRailings.com, and stain, came in about $300. Not too shabby when you consider just how expensive the custom closets can be. Now I just wish we had additional space to build a full scale walk in closet. I'm talking Oprah style closets here, but that would require a room at least double the size of our entire bedroom. Oh well, I guess that dream will have to wait.

What do you think of our closets? It may not be grand or something truly unbelievable, but with the size of our home and what we had before (as in, nothing) what we have now it tremendous to us. We absolutely love them and like using them each and every day.

Comments 36

Comments

1/28/2013 at 3:15 PM
Oh my goodness, these look amazing!! I especially love the separate shoe closet in the middle. And I know what you mean about wanting his-and-hers closets -- my husband and I just bought a house with two closets in the master bedroom, and last night when I unpacked my clothes from the moving boxes and hung them up, I wondered how we ever shared a closet before. Double closets are the best!
Wendy
1/28/2013
Thanks, Kelsey! I love the shoe closet in the middle too. :-) I hope I'll feel the same way once we have double sinks in the master bathroom -- how did we survive without it?
Tamara
1/28/2013 at 3:16 PM
The "hers shoe section" reminded me of this one: youtu.be/wjkUkqTUHNc

So what are you dreaming about, Alex? :D
Wendy
1/28/2013
LOL - Hilarious!!

I think we could get that reaction from Alex if he had a closet to organize his tools!
Bea
1/28/2013 at 3:38 PM
Wow! Those closets are beautiful! And they were a ton of work. But that just makes them even more special every time you use them. Amazing job.
Wendy
1/28/2013
Thanks, Bea. Yes, a lot of work but definitely worth it. :-)
1/28/2013 at 3:42 PM
Found you guys via the Express. This gives me SO much hope. We just bought a 1940s home with very very little closet space. Great job!
Wendy
1/28/2013
Hi Erinn -- So glad you found us and thank you. Good luck with your new home!
1/28/2013 at 4:01 PM
Wow. I bow down to you.

When we moved into our house we realized that some rooms were missing doors altogether and that the doors into several of the rooms - including the bathroom - didn't close properly. Alan spent weeks sanding, and stripping, and trimming. Eventually he gave up on the stripping and just went with white paint because the doors were too damaged, but yeah. Long, laborious, insane project.
Wendy
1/28/2013
Doors seem to fall into the category of "we can fix that no problem!"...but then they spiral out of control. They're a ton of work, but so worth it in the end.
1/28/2013 at 4:04 PM
I am so impressed by your closets! Somehow you make it sound easy.
Wendy
1/28/2013
Thanks, Abby. It was a pretty complicated project, and of course took longer than anticipated, but we're so happy with how they turned out. :-)
maggie
1/28/2013 at 4:54 PM
I agree! You make it sound way easier than it had to be!
Wendy
1/28/2013
Honestly it was a time consuming and, at times, frustrating project. But I'm so glad we decided to tackle it because we're so much happier with the new closets. Plus, they look like they've always been there, which is one of my favorite parts. :-)
maggie
1/28/2013 at 10:59 PM
and you didn't talk about the storage above the closets. Is that for another post?!
1/28/2013 at 5:35 PM
Very, VERY nice!! (I hear ya about the difficulties of using salvaged doors.) Don't you just want to sit on your bed and stare into your wonderful closets?

One of your photos gave us a little peep into the upper space ... I'm sure you have super plans for that area, too.
Wendy
1/28/2013
Thanks, Connie. Yes, I have to admit that I still gaze into the closets to admire our handiwork. :-) And yes, the upper space is a hard working spot for us too. We'll be sharing the details on that section soon.
Justin
1/28/2013 at 7:49 PM
very impressive
Justin
1/28/2013 at 7:50 PM
also, I like the rug in the bedroom - though I can only see the corner of it - where is it from?
Wendy
1/28/2013
Thanks, Justin! The rug is an antique we found on eBay. More on it in this post: www.oldtownhome.com/2012/11/9/Master-Bedroom-Reno-The-Attic-Stairs-are-In-and-Im-Alive-to-Tell-the-Story/index.aspx
max1023
1/28/2013 at 11:27 PM
That closet looks fantastic, I especially like how you took the time to tie in the old doors to make it look timeless. I hate when you see people take all the charm out of old houses. Sometimes its easy to feel overwhelmed when you look at the entirety of a house renovation. Thankfully when you take it in small steps like you guys it seems less intimidating. Thanks for sharing, I know your fans appreciate it.
1/31/2013
Thanks for the kind words. I do love the idea that the closet could be there for another hundred years without a second thought.

I am glad it seems less intimidating. It is all very attainable if you take it one step at a time, even if that step is taken very slowly.
Justin
1/28/2013 at 11:38 PM
wow....you have purchased 9 antique rugs on ebay. I think I found 5 of them clicking through the before and after photos of your house. Good stuff.
JC
1/29/2013 at 2:23 AM
Wow! Only 300$? Is that including the salvaged doors?

I admit that I'm anxious to see how you guys did the top doors. They look identical to the bottom doors, but I get the impression that you didn't have to find another 5 matching doors just to cut them in half.

And yes I have closet envy. My Master Bedroom closet it fine for one person, but the house is really lacking in storage space, so it's better than nothing (considering that the 4 original bedroom closets were only 16" deep, and about 50"-55" wide). At least there's ample space for furniture/dressers.
1/31/2013
I think the salvaged doors were another $240 on top of that. The $300 was just for the interior elements of the closet.
Jan
1/29/2013 at 8:39 AM
My grandmom's 1910 Philly rowhouse had a closet wall in the master bedroom very much like the awesome one you built ... except no top storage, and one of the doors was mirrored. The other bedrooms had very shallow closets with hooks (people back in those days didn't have so many clothes). All the second-floor doorknobs were that lovely cut glass, the bathroom had a huge clawfoot, and the door to the back bedroom had a big frosted window with an etched design (tree of life, maybe?) I can only hope that the folks who own the house now have treated it half as well as you're doing with your place!
1/31/2013
Since we've installed these closets we've seen a few examples of how older houses have similar setups. Every time we see one it warms our heart that we were possibly doing it the right way. Sure, our house wouldn't have had closets, but if they had, perhaps they would have been like the ones we built.
1/29/2013 at 9:27 AM
I am super jealous of your shoe closet...maybe one day I will have one of my own :)
1/31/2013
You should definitely go for it! I know Wendy appreciates it almost every day.
1/29/2013 at 7:06 PM
Very nice! The storage compartments in the top were a really good idea. You need to make every inch count in creating a storage space and this was an excellent way to do it!

One of these years, we want to build a custom closet in our back hallway to hold coats, shoes, etc. We already have most of the parts (salvaged doors, pipes for the coat hanger bars, etc.), but need to finish the bathroom before we even think of beginning this project. One thing that we have priced and looked into using is tongue and groove cedar boards on the interior.
1/31/2013
Were you looking at aromatic cedar or regular? Since our closet is so close to our bed, I would worry that we'd feel like we're in a hamster cage if we did aromatic.
Karin K
1/29/2013 at 8:16 PM
What do I think of your closets? I want them. I'll keep it simple today... I looked back at my last comment on your blog and it looks like I was drunk. I don't think I was.... Oh - I also want Wendy's shoes.
1/31/2013
HAH! I love drunken comments. Feel no shame in that. ;-)
bfish
1/31/2013 at 6:49 PM
I think you all are too modest -- these closets are really awesome! Your attention to detail is the best; honestly I don't think you could pay anyone to do that great of a job. I guess that's a lot of the reason we are DIYers, because it's pretty hard to communicate to even a skilled tradesperson the vision/design and the commitment to doing things absolutely right (no matter how much time and fiddling it takes).

Our "old house" is from the 1920s so it had closets in all of the bedrooms but they're tiny. There were also built-in wardrobes and cupboards in a couple of rooms but none of these were built to our standards of quality let alone Alex's! We have reused elsewhere all of the original panel doors we've removed, as well as some original louvered (heavy duty, not like the crap they make now) doors which we've employed for new closets.
11/25/2013 at 11:20 AM

This is AWESOME!! My hubby & I are renting our first-ever condo together & I'm already thinking ahead to when we can pull off a fun custom closet like y'all!

Leslie
6/16/2014 at 10:26 PM

I LOVE your closets!! The BEST part is the top. That is a GREAT idea!
I'm in the process of creating a master bedroom. I just took a wall down between two bedrooms. That wall was the closet for one room and the closet in the other room. I want to creat a long closet along the wall. I think a real walk in has a lot of wasted space. If I had a HUGE home I may think differently. I know you said that the length of the closet was 14 feet. How tall are your ceilings? What are the measurements of the upper cabinets?

Thank you in advance!

Leslie

Since you've not signed in yet, you will need to fill in your name and email below. If you have a Facebook account, save yourself a step and use Connect to login.

Denotes a required field.

Please enter full URL, including http://

You can use Markdown syntax in your comment. And you can also use lots of Emoji!
  • Search

  • Login
  • Follow
  • Advertising

If you're looking for information on advertising and sponsorships, head on over to our sponsorships page. You can purchase site sponsorships in a few easy clicks. 

Toolbox Tuesday
Open Housing
  • We're Featured!

Old Town Home has been featured in the following places and publications:

The Washington Post
 
Washingtonian Magazine
 
Domino
 
Old House Journal
 
 
Apartment Therapy House Tour
 
Washington Post Express Feature
 
Home & Garden Blogs
 
© 2024 OldTownHome.com. - Privacy Policy
Login Below
or
Sign in with Facebook
Connect

Unexpected Error

Your submission caused an unexpected error. You can try your request again, but if you continue to experience problems, please contact the administrator.

Working...

Working...