We're going to make a slight change this week and move our regular "Toolbox Tuesday" to "Toolbox Thursday." Why? Because we're excited about our latest blog feature that we announced just last week.
In our new section called "Ask Old Town Home" you have the opportunity to ask and have your questions answered to the best of our ability. After we announced the "Ask" feature last week, we got a couple of really good questions that we're working on answering. Today's topic comes courtesy of another local Alexandria blogger, Katie of DIYDelRay.com. Katie asks:
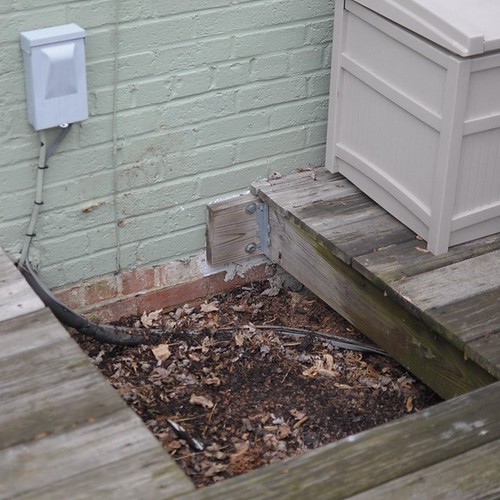
A couple of years ago, we had to get a new a/c. The old one was located in our small backyard with a low deck surrounding it. The new a/c didn't fit in this spot (the new energy-efficient models are HUGE!), so we had to put it in a different spot in the backyard (the entire yard is about 16x16 feet). Now we have a 28x28x10-inch hole in our deck. It's not a huge hole, but it's big enough that someone could easily trip and get hurt. What to do with the hole? My only thought is to build a custom-sized planter to go inside and then fill will dirt and plants, flush with the top of the deck. Any thoughts on this? Advice for getting started? THANKS!
Thanks for your question, Katie. I actually have a few ideas about what you could do to remedy this situation. First and foremost, I think you need to address the hazard this spot presents to adults and children alike. As you pointed out, the hole is large enough to cause injury to someone. Therefore, I'm going to recommend options that will eliminate the likelihood that your guests will be asking you for an ace bandage. Here's another look at the gaping hole that was left by the old AC unit.
Old Town Home's Answer:
Let me first say, no matter what you're going to need to leave yourself access to the electrical disconnect for your AC unit on the wall, and you're going to want to ensure you don't damage your copper line set that runs out to the AC unit. So first thing first, you're going to want to put a piece of decking right back against the house and cut a notch to accommodate the electrical. I would cut back the deck boards just a bit so you can nail or screw a new piece of wood that will match right up with the old deck. Ok, now for our answer on what to actually do with the hole. Here are three good options that come to mind.
- Patch the hole with wood to create a flush patch. I know, I know. This option is the least sexy of them all. But at the very least, I think you need to level out the deck to create a safe space. Of course, the new wood will stand out a bit from the existing weathered wood of your deck for at least the first few seasons.
If you wanted to go this route you'd need to either use a plunge router or oscillating cutting tool (oscillating tool is probably best to get right up to the house) to cut the existing wood back a bit to give you the ability to nail new wood to the joists. I'd even cut alternating pieces back further to other joists so you're not looking at a single square patch. If you take the time and weave it together you won't be able to tell you ever had a hole after a few seasons of rain weathers the wood.
- Create a raised planter. As you suggested, this is a great opportunity to take advantage of a negative, and turn it into a positive. Adding a raised planter here could introduce softness and color on a deck space that has a lot of hard edges.
You could build the planter out of similar wood (pressure treated) with vertical lines all around, and verticle pieces of wood overlaid on each corner. Then put a cap on the top of at least 1x4 pieces of wood mitered in the corners. I'm thinking something a little bit like this box, but built just right for the size opening you have.
Since you have your air conditioning line set and power for your compressor, you'd need to create a frame for the planter to sit on just inside of the hole. Use 2x4 pressure treated wood and screw them (with exterior decking screws) to the joists you can see, setting them a bit down below the surface. You would also want to screw a few pieces in from one support to the other to give as much structure as possible. Then when you build your planter you'd just let it sit down on those 2x4s, you wouldn't even need to nail or screw it in place.
Finally, add some 1x3 or 1x4 as a bit of "baseboard" moulding around the base of the box to disguise the fact it is sitting in a hole in the deck. That way it will look finished and like it was always meant to be there.
- Create a raised cooler! My personal favorite is this last idea. Nothing says par-tay quite like a built in cooler. What I envision is a raised cube, fitted with a plastic lining, with a removable or hinged lid. When not in use to chill frosty beverages, use the cube for storage as well as extra seating or a serving area. It could look something similar to this $800 teak cooler from Frontgate (YOWZA!). I think you could probably build it to look quite nice and integrated for roughly $100-$150 in supplies.
You could construct this in a very similar fashion to the planter, but the biggest difference would be a lid and a liner for ice.
Similar to the planter idea, you can build the whole thing to sit in the hole on supports screwed right to your main deck joists. You could even put drainage holes in the bottom of the container area to make it easy to allow cooler water to run away from the cooler.
Using large 5 gallon square pails, like these from Amazon, would allow you to build the container at just the right size to fit one or two square buckets. It would be the perfect size to keep your refreshments cool.
When not actively in use, the lid is closed and you can easily use it as a seating area, table for other deck items, or just as a place to put a plant. At any rate, it would be a safe, functional, and convenient addition to your deck.
The main thing you want to make sure of is that any pressure treated wood wouldn't come directly in contact with the ice, water, or drink containers. That's why these plastic pails would work so well. You can fill them inside and then bring them out when the party is starting and drop them right in their openings. If you have several containers, as the party progresses, just keep swapping out an empty one for a full one.
Well, what do you think of our ideas? Have any ideas of your own that might steer Katie in the right direction for this space? It's got a ton of potential, and you can't beat making an outdoor space more functional. Leave a comment for Katie and give her your two cents on what you think they should do with their large deck hole.
Do you have a question? Just head on over to our "Ask" form, located in the right hand column of the site and fill out any questions you may have about our projects, your projects, a recipe you saw on our site, Alexandria, Washington, DC, or or anything you think we may be able to help you with.

Disclaimer: Ask Old Town Home is meant simply as a friendly bit of advice and is provided free of charge. It is your responsibility to fully research any and all items related to projects or suggestions to ensure proper safety and code precautions and regulations are fully followed. In other words, any advice we provide is just our opinion, and our opinion is only worth the price we charge for it. :-)