If you've been following us on Facebook and Twitter, you know about the bit of HVAC duct work I've been doing lately. It's all in anticipation of our master bathroom renovation, and it's not a lot of fun, however necessary the work may be. (But if you're not following us, you're missing out on the inside scoop. But worry not, now's your chance to "Like" or "Follow" us to be sure you don't miss out on more action.)
It started with a large section of duct work that comes down into our master bath. It comes through the ceiling, then terminates. It was once boxed in by some drywall, and used to exit through the wall into the next room (the guest bath), but now sits there looking ugly and capped off. It was our goal to remove this unsightly duct and make it terminate in the attic rather than at the end of the bathroom. But as you know in DIY land, a simple goal like this rarely comes without some significant surprises or hurdles.
I was able to disassemble much of the duct, but had to go into the attic to remove the rest. Over the weekend as I dug around in our dark, tight, and cold attic, I made a startling discovery. It seems that the HVAC contractors that installed our home's duct work for central air conditioning (probably at some point in the 1980s) took some short cuts in their project. It appears they assembled the duct work and cut the necessary holes outside of the attic, then slid the pieces into their place where they later planned to attach the ducts to one another or connect the duct arm to the main trunk where they intended.
As I began to poke around in the attic, the duct work moved freely and I realized it was more or less not attached to the main trunk. Then I realized the most shocking thing of all -- the person that installed the duct work had cut a large 7" diameter hole in the side of the duct, probably realized they couldn't reach that hole once it was installed, and then just left it open.
Yes, a large circular hole in the side of the duct work had been open in our uninsulated attic space for probably 30 years or more. Unbelievable!
So I took it upon myself to remove the poorly attached and offending duct work, ridding our house of this disastrously inefficient configuration once and for all. Here it is in all of its glory, removed from our home. It looks like the person that cut it used a can opener!
After removal, I cut a new piece of metal that I could then attach to the end of the main duct trunk that would attach to the flexible insulated duct that runs through the rest of the attic. I also cut two 7" diameter holes in that material so I could reconnect the flexible duct that runs to the back of the house. I couldn't use a standard sized boot because the duct I was attaching it to wasn't square. Because of the way it was installed it leaned pretty significantly out of square, so I had to get creative...all in a space that isn't even large enough to turn from my back to my stomach. I have the bruises on my ribs to prove I did this work myself.
I used several sheet metal screws to attach the new boot, then sealed the whole thing with foil tape. I capped off the two ends and turned on the heat and tah-dah. No air leaks!
I had successfully completed step one of our reconfiguration, but it caused an issue. I removed about three feet of duct to resolve the issues, and now one of the pieces of flexible duct wasn't long enough to connect to the new piece I had fabricated. In order to connect up the duct, I needed to splice a new piece of flexible duct with the old piece.
I had a four foot length of 6" metal duct in the basement, so I cut a short piece to act as a splice. This was perfect except for the fact that one side of the splice was missing the necessary size reduction to allow the flexible duct work to fit over the end of the splice.
This is where our Toolbox Tuesday post actually starts.
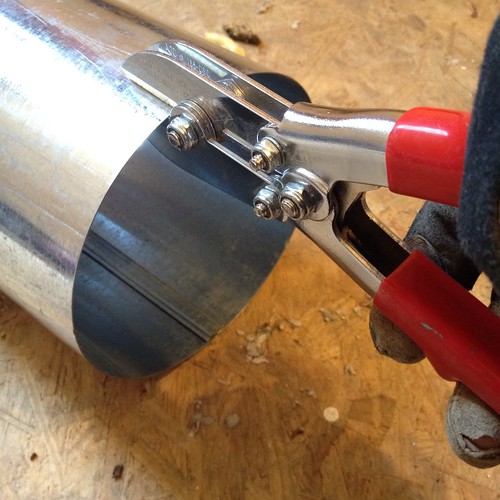
Several years ago we did some gutter work that required the perfect tool for this job, a downspout crimper. This is a simple hand tool that allows you to place the mouth of the tool over the edge of the metal and apply pressure. This pressure and the configuration of the tool's teeth create a zigzag pattern over the circumference of the end of the duct (or downspout). This pattern reduces the size of the end of the duct and allows it to fit neatly inside the other connection.
Use of the tool is incredibly easy. You just start anywhere on the end of the duct and work your way around until you've covered the entire duct end. By the time I was done I had the right piece for our duct work woes and was able to splice the old flexible duct work with the new.
All that was left was to slip the slice into the new duct work, apply a metal clamp and some foil tape, and then connect up the new bit of duct in the attic and we were all set.
Though it wasn't the most glamorous Sunday afternoon of home renovation, and there weren't any fabulous reveals to be had or painted rooms to behold, it was a wonderful step in the right direction. Our horribly inefficient attic duct work was made just a little bit better, and a giant piece of protruding duct work had been removed from our master bathroom. After connecting everything and turning on the furnace I could immediately feel a significant increase in airflow throughout the system.
One of the major problems with doing work on a Sunday evening is running into an issue and needing supplies or tools when the stores are closed. I was quite happy to have the necessary duct work and crimping tools on hand to allow me to complete this project before having to spend a night with our heat off. Nothing says "Why are we in this DIY hell hole?" quite like non-functioning critical heating utilities on a cold winter night.
What do you think of our duct work progress? Nothing too pretty to look at, but it's so much of an improvement. And how do you feel about the convenient crimping reducing hand tool? When I first bought it years ago I figured I'd use it on the gutter downspout and never use it again, but I've used this crimper on projects all over the house.
Did you enjoy reading this post? Want to learn more about our first-hand experiences with other tools, devices or items used throughout our renovation? If so, check out our complete list of product reviews in our Toolbox Tuesday section.
Note: We weren't compensated for this review. We simply want to share good products when we see them, and hope that learning from our mistakes can help save you time, money and frustration.