We'll be back a little later today with the second of our Twelve Days of Christmas Giveaway posts, so stay tuned. If you've not entered yesterday's First Day giveaway for a $50 gift certificate to Bishop Boutique, be sure to head on over and leave a comment.
In our last post about Wendy's great-grandfather's chair, we filled you in on the chair's history, as well as the journey it had taken from basement to basement until it reached our home in need of a little TLC.
The chair has transferred hands several times in the last 40-50 years, each owner having full intentions to refinish and repair the chair back to a functional piece of furniture. Who knows how long it had been in the state it was in, but to the recollection of Wendy's mother, it was even in the Wendy's great-grandfather's basement for quite a bit of time.

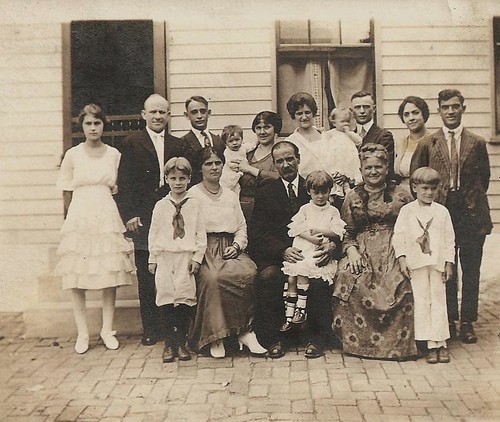
Wendy's Great-Grandfather and Great-Grandmother are in the back row, 3rd and 4th from the right, holding her great-aunt Marge.
As legend has it, one day Wendy's great-grandfather locked himself out of the house. As a spry 80 something, he was able to jimmy open a basement window and crawl through to gain access to the house. The chair was apparently sitting below this window, and was the only thing that allowed him to step into the basement rather than fall. Perhaps this is where it developed its signature wobble.
Having sanded and prepared the chair for finishing (and correcting the wobble), it came to a point where we were ready to apply a stain. Wendy had hinted that she wanted to paint the chair at one time, and since I had just spent a significant amount of time sanding it, I simply didn't feel this was a viable (or reasonable) option. Rather than paint, I suggested we stain the chair a very dark brown, with which Wendy agreed. Okay, maybe Wendy begrudgingly agreed.
I began researching the type of stain we'd want to use to achieve the dark look. We've only ever used oil based wood stain before (and I believe gel stain on one project at some point), but the use of dyes has intrigued me for some time. I know it's a far more effective way to really get those deep and dark colors, as well as a way to make certain species of wood look like other more expensive species, but I was a bit nervous to try something new on something old the cherished heirloom.
After doing a lot of research and seeking a significant amount of advice from several people, I felt I was armed with the info we'd need to proceed. Though a reader or two had cautioned us against the possible perils of using dye, we threw caution to the wind and opted to go for it.
If you're not familiar, dye is a tried and true means for coloring wood, and one that's been in use for centuries. Oil stain is actually a rather recent invention. In our case, we opted to use a water soluble aniline dye. Though we chose water soluble, there are also alcohol and shellac based options, each with their own unique properties.
In the case of dye, when you apply it to the wood it actually absorbs into the wood and changes the color. Typical stains or cut shellac essentially mask over the surface with the color, this is why you can't drastically make a stain darker by applying additional coats. The aniline dyes will dye the wood with each coat, making it darker with each application. The advantage, in my eyes, is that it actually changes the wood, and you can use dyes to make the wood you're working with look like a different species.
We ordered a small one ounce vial of dye from Woodworker's Supply. The aniline dyes actually come as powder that you mix by volume. The more powder, the darker the color.
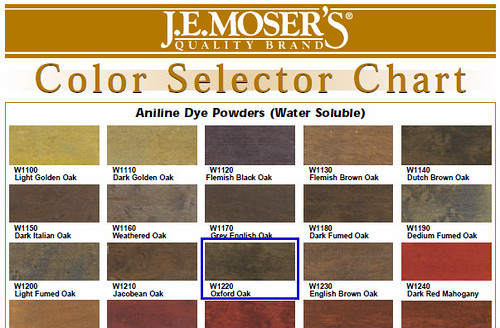
The color we selected is called Oxford Oak and it looked to be a very dark brown.

For a complete listing of colors (and there are a ton), check out the full color chart.
To properly gauge how much dye we were mixing I made pen marks at the quarter lines of the vial. This way I'd be able to see when I had placed the proper amount in the glass jar.
Following the instructions we used very hot (but not boiling) water and mixed it into the powder.
It instantly became a very dark color. We put the lid on the jar and shook. Note: Use correct lid and tighten, otherwise this happens.
Also, be sure to wear gloves, otherwise your nail beds will look like you're a garage mechanic for the next two weeks.
After a good mixing, we poured the dye solution through a strainer to remove any of the undissolved or gritty dye particles.
Once the dye was mixed we began applying the mixture to the chair. We both started in out of way locations that we knew would be covered by the chair pad. We did this to be sure the color was what we wanted, but would allow ourselves an out if it was looking horrible. Luckily, the color was exactly what we were looking for.
We continued by methodically working our way around the chair using foam brushes.
Much like painting, you want to maintain a wet edge. This way you're not doubling up coats of dye. If you double up on an area that has already started to dry, you may end up with some splotchiness.
We were both really loving the rich color of the dye. One small mistake was how Wendy started the back of the chair. She began with a strip right down the middle. This made it difficult to cover the right and then the left without accidentally doubling up on dried stain. It would have been better to work from one very edge to the other. Lesson learned.
The other problem we kept running into was drips. In retrospect, it would have been better to work from top to bottom, correcting drips as they occur. We were working from the bottom of the legs and working up, so gravity was against us, and any drips had the chance to go over already applied dye. We had to be very diligent in our inspection and proactive with our corrections.
It's also important to note that our application was done using a foam brush, but a sprayer may have been much better at giving a more even consistent covering.
Once we finished the first overall coat the directions dictated a 12 hour dry time. During this point, we actually grew a little concerned. As the dye dried, the color changed from the deep and rich brown to an almost green hued brown.
We also had to keep telling ourselves that it would look better once we applied a topcoat. We had also planned on applying a second coat of dye, since the instructions suggested it.
Once the whole chair had dried, we were actually a little more than concerned. The stripe down the middle of the chair's back was obvious, you could see a few areas of overlap on other parts of the chair, and the color was somewhat inconsistent from spot to spot. Though troubling, I resisted the "OMG I'm totally freaking out," response I would have normally gone for.
Since the dye is a water based dye, it had slightly raised the grain (fuzz) of the wood. This gave the previously smooth chair a bit of a rough feeling. I knew we'd need to give the whole thing a light sand, so I was holding out hope that this sanding process might be able to correct the issues. I grabbed a bit of 400 grit sandpaper and got to work.
It's important to note that all of this sanding was done by hand. I just wanted to smooth out the problem areas and remove the fuzz of the wood. When I hit the areas of blotchiness or overlap of dye coats, I could see the harsh transitions fade just a bit. The key to the success of correcting the issues was actually dropping down and using 200 grit sandpaper in the very dark areas that I wanted to slight lighten. Then going back over those areas with the 400 grit paper evened it all out a bit more.
After the initial sand we looked over the whole chair and made the executive decision (collectively as executives of our house...no, Lulu and Mel didn't have a say because they aren't allowed in the disaster of a basement) to forego application of the second coat of dye. It would have required an extra day to dry, as well as mixing a much lighter batch of dye, and we were satisfied with the color. Besides, we still had some sliver of hope that we'd be able to put the chair out during last weekend's home tour. Rather than a second coat of dye, we moved right onto topcoat application.
We had several different options for the topcoat. We could use an oil- or water-based polyurethane, as we've done for several other projects, but this didn't feel right to us. We could have also used lacquer, but I sort of had my mind set on shellac.
Shellac has a few qualities that I really like about using it as a finish for this project. First, it's an alcohol based topcoat. Since the dye is water based, we needed to use an oil- or alcohol-based topcoat. Second, it's an old, tried and true product. Shellac has been used in wood finishing since the early 19th century. It was replaced in the 1920s and 30s by lacquer, and more recently, polyurethane. Third, the dye we used had almost no reddish color to it. Using shellac would add a slight amber color to the final product that we thought might be appealing and help us land on just color we were looking to achieve.
We went ahead and applied two coats of shellac with a 24 hour dry time in between. We also sanded the first coat of shellac with 400 grit sandpaper to give the second coat a really smooth finish.
The timing of the second coat meant we were actually applying the second coat of shellac on Friday, the day before the home tour. To say we were cutting it close is an understatement.
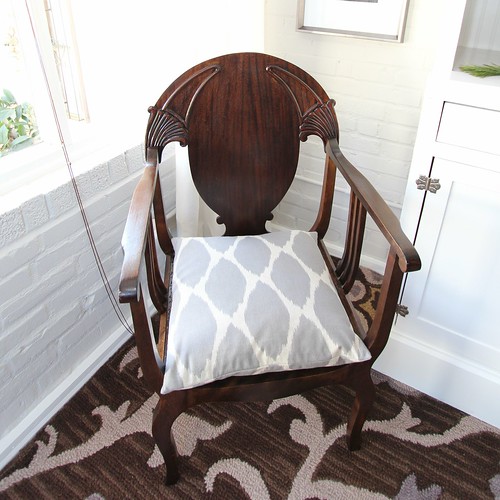
After a few hours of dry time we brought the chair upstairs and put it in its final resting location to see how it looked. The verdict? We love it!
There are a few small areas on the very top part of the back that have a slight discoloration due to damage to the plywood, but those are easily overlooked since there's little we could do.
The color, scale, look, everything, is exactly what we were hoping for in using the dye. I'm officially a fan of what you can do with dye. I'm excited to try it on a few other projects and see what I can do about making something new that's made out of poplar look old.
We still had to place the chair's seat base in place, but we were getting close to having a functional chair. Though we had somewhat given up on using it during the home tour, we were still happy with the outcome. But we were both secretly hoping we'd be able to complete it.
We'll fill you in on the next step in another post, but until then, what do you think? Are you a fan of the dark wood? Or do you prefer a lighter stain? Have you ever used the dyes, or are you primarily a stain person? What about paint? Do you think I should have given in to Wendy's impulse to paint the chair? So many questions. Weigh in and give me your two cents.

![]()
![]()