With all of our errands, work, driving to and from Ohio, whole house audio setup, baseball games, home tours, cooking, cleaning, laundry, and life in general, it feels like we've not had any time to actually work on the doors for the vestibule project. We're getting so close to being done, but we're also into the tedious last steps of the project. After the last post about getting the new French doors sized and placed (sheesh, two weeks ago), we finally got moving on the crucial next steps this past weekend.
One of the major steps towards a finished product was installing and glazing the glass I had cut for the French doors last month. But before I could get to glazing, I had to finish the prep work on the doors to get it into a place where I could actually install the glass. I wanted to make sure I got all of the cutting and sanding done before I started on the glazing. That last thing I want is for a bunch of saw dust to get caked into the glazing compound before it fully cures.
Over the course of the previous week I had performed the final prep work necessary to get us into a position where we could do the glass install, so let me get you up to speed.
The first step was to do a final fill of all holes, gaps, crevices, and chunks that were still in the doors. These doors had seen their share of action as side lites to a front door, so there were a lot of small nail holes, dings, and missing portions of wood that needed attention. I used my favorite wood epoxy and mixed up batch to fill all of the problem spots on the door.
I started sanding the door before the epoxy was dry (apparently 24 hours sometimes isn't enough), so I gummed up a few sanding discs before deciding to give it a break and just let the epoxy fully cure. After a "quick" two day dry and our return from Ohio, the door was ready for its final sanding.
This final sanding also allowed me to make all of the wood between the old doors and the new extensions even and smooth. Once all was said and done, and the doors are painted, it will be tough to tell the old wood from the new. I sanded both sides of both doors with 80, 120, and 220 grit paper to give it a very smooth finish surface.
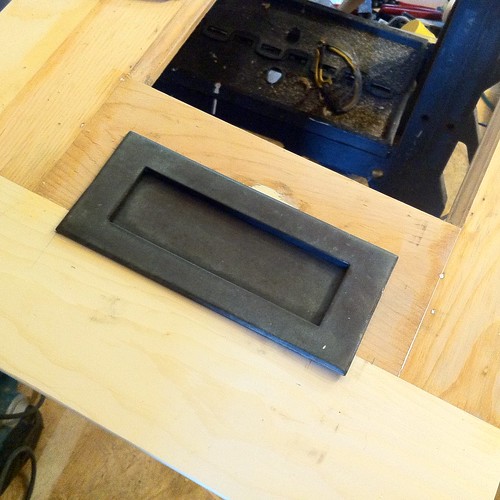
With all of the sanding done I moved onto mounting our old door's mail slot on the new door. The old mail slot is a brass and bronze (I think) mail slot that has some great old patina to it. Also, it is large enough to handle all of the catalogs, large letters, and the like that we tend to receive. The mail slot in our new front door is too small for much of the mail that gets delivered, so we needed an alternative or all of our mail will just sit in the vestibule. For this reason we wanted to put the old mail slot in one of the French doors so that the mailman could deliver to that door instead of the new door. Follow? Good.
The actual cutting of the door was pretty straight forward, but cutting into something that I've worked for months to make "perfect" is always a little nerve-wracking. I've learned from past mistakes, so now I always measure 5000 times, mark everything with a pencil, and then hopefully cut once. Even so, I almost cut and installed it in the wrong door. Glad I caught that before the first cut. Here's the door cut location all marked and ready to be cut.
I always start cutting with the jigsaw by drilling a hole near the first cut with a 1/4" bit (or one that is large enough to have the jigsaw blade fit in the hole). Then I start cutting with the jigsaw. In this instance I clamped a guide board to the door to be sure my line was nice and even.
I carefully cut away all of the material that I needed to remove, making multiple cuts where necessary to be sure I didn't make a mistake. After several minutes of agonizing fear that I would make a mistake, the new mail slot hole was cut and ready for the mail slot test fit.
The moment of truth...
Looking good! <HUGE sigh of relief>
Once the mail slot was mounted I could turn my attention to the next task at hand, priming the inside of the door. Since we are using standard glazing putty for the glass, it is best if the area where the glazing comes in contact with the wood is first primed. The glazing putty has linseed oil in it, and if left to be in direct contact with the wood, the linseed oil will seep into the wood and dry the glazing out prematurely. This will leave the glazing to dry and crack, failing far sooner than it normally would. Various manufacturers give different advice, but it is always best to prime your sash or doors that you are glazing BEFORE you glaze. I use an oil based primer in this situation to ensure the best possible protection.
I had to give the paint four hours to dry before I could start with the glazing, but once it was dry I jumped to the tedious glass installation process.
"Why tedious?" You may be wondering... Because I'm obsessive and crazy slow. No joke. I've seen people who can glaze a small window like this in under 5 minutes, and it looks great. Me, no way! Each one takes me at least 20-30 minutes. 12 pieces to glaze, 20-30 minutes each, yep, that's about six full hours of glazing.
For this glazing install I'm using Sarco's Dual Glaze putty. It is much easier to work with than the Dap 33 you see in most stores, but it skins faster for painting.
After a couple hours of effort, I had one of our two doors completely glazed. Unforutnately, I didn't order enough putty, so I had to order more this weekend to complete the project. Oh well, at least I'm half way done and the door that is done is looking good.
Unfortunately I ended up breaking one of the pieces of glass. I wasn't being as careful as I should have been and put too much pressure on the glazing point. Luckily, I have a small piece of spare glass that should be big enough to replace the broken one. It sure is frustrating to have breakage this late in the game, that's for sure.
I'm going to keep working on the glazing this week, but once it's all in I will need wait for at least a week or two for the glazing to skin over before we can paint. I'm going to be using a special paint for this application, so stay tuned, it may be fun (or a complete disaster). We shall see.
Do you have any experience in glazing? Ever have any desire to try glazing? Perhaps some tricks I can use to make myself a little bit faster at this tedious (for me) task?