It's been a fun WEEK OF ALEX series of posts, but my solitary posting is coming to a close as Wendy is due home later tonight. To be perfectly honest, I can't wait until she's back. I grew up an only child, so I can exist on my own pretty comfortably, but our home really isn't our home without Wendy here with me, it just feels sort of empty. Not to get too sappy on you, especially with all of the fun we've had with WEEK OF ALEX. Don't worry, it's not you, it's me.
Since we moved into our house in 2003, the energy efficiency of our front door/vestibule area has always been a fairly significant issue. We've struggled with the fact that just getting near the door you can feel how warm or cold it is outside.
When I say it was bad, I mean it was bad. (Now you say: "How bad was it?")
It's so bad that In the heat of the summer and deep cold of the winter, you can almost see the money being sucked out of our pockets and blowing into the street. (That sounds almost like an HVAC commercial, I can see it now.)
It was so bad that you can actually see through the cracks in the door or above the door directly to the outside.
It was so bad that the old inner double doors would open on their own with the slightest breeze.
It was so bad that you could hear wind whistling through the large mail slot.
Do you get the picture? It was bad.
With our reconfiguration effort and adoption of our new salvaged front door, I wanted to do a few things to make our new setup more energy efficient while maintaining an historic look. In other words, I didn't want to cut into the door to install foam, compression weather stripping, or spring loaded vinyl weather stripping that pops out when you close the door. And I really didn't want to do anything like vinyl or foam that will quickly wear out or possibly grow mold.
The solution for historically correct weather stripping that will last another 100+ years is actually quite simple, it's called Spring Bronze. Spring Bronze is type of metal weatherstrip that is nailed to the door jamb on one side and springs away from the jamb on the other side. The idea is that it compresses against the door when it is closed, preventing drafts from infiltrating the interior of the house.
Over the years I've purchased all of my spring bronze from one place, Killian Hardware. They have so many cool things, like plaster buttons, very worth checking out their inventory.
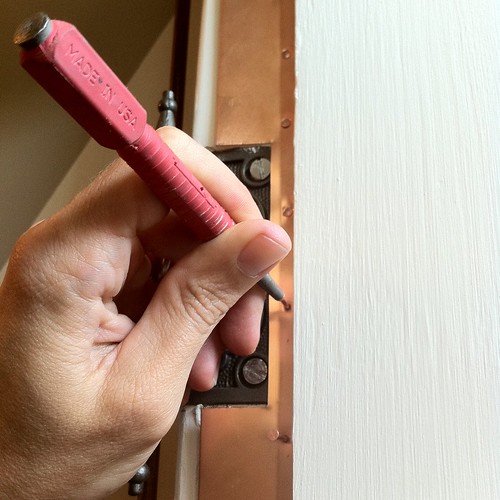
I bought a 100' roll of 1 3/4" Spring Bronze a little while back and have been using it for window and door weatherstripping for a few years now. I decided to use this for the hinge side of the new door. As you can see from the following photo there used to be spring bronze weather stripping installed in this door way at some point. You can tell this by all of the nail holes that are still visible on the right hand side.
I started by measuring the length of the door jamb to cut the necessary material from the roll. Since this was is going on the hinge side I needed to cut out a partial section of the material so it doesn't obstruct the hinge. The first step was to hold the Spring Bronze up to the jamb to mark the hinge locations.
Once the locations were marked, I used tin snips and normal scissors to cut away all of the back edge of the Spring Bronze. Then I lined the Spring Bronze up in the opening and partially drove two nails to get the weatherstripping started.
Though I've seen you are supposed to place the nails 1 1/4" apart, I like to place them a little further. Using a ruler, I make marks with a pencil every 1 1/2" so I have an easy time placing the nails.
On the hinge side the nails usually go towards the inside of the jamb. As the door closes the edge of the door pushed the Spring Bronze tight against the door and jamb. But the placement of the nails makes it very difficult to use a hammer to drive them all of the way in. So I used a small hammer working from the top to the bottom to place the nails just deep enough to secure the weatherstripping.
Then I used a nail set to drive the nails the rest of the way into the jamb. This takes some patience, but you have so much more control driving the nail this way.
Finally, after what seemed like hours of hammering (and I'm sure my neighbor thought another earthquake was occurring), the hinge side weatherstripping was securely in place and ready to protect us from the cold.
The knob/lock side of the door required a smaller 1 1/8" size of Spring Bronze because it is nailed on the opposite side of the jamb (the side towards the room), so I ordered a small kit from Killian for that. I following the same process as the other side, but was able to drive the nails all of the way in using just the hammer, no need for the nails set on this one.
One final thing I added before the whole weather stripping endeavor was an upper jamb stop for the door. The old opening didn't have one because someone added that molding at the top of the jamb. I have no idea why that happened, but we decided to leave it that way. The same thing happened on the outer front door, and that is why you could see right through the top of the door. So I cut a piece of scrap poplar that would fit in the opening. I installed it with pocket hole screws and then filled the holes with some wood epoxy.
Then I sanded the epoxy smooth an caulked the edges (using Big-Stretch caulk, of course).
I added a little primer and paint, and we were good to go. And that takes us one major step closer to putting the salvaged door in its permanent home.
Let's take a moment to see where we are on the massive front vestibule checklist. We're getting close, I can feel it.
- Sand extension piece smooth
- Install molding
- Fill nail holes
- Fill old holes and gaps
- Fill old hinge locations on door jamb
- Sand door jamb
- Prime door jamb
- Paint door jamb
- Install weather stripping
- Transfer peephole
- Transfer knocker
- Transfer rim lock
- Buy and install deadbolt (Dont need this step)
- Complete/fix mail slot Grrrr... Purchase new mail slot
- Final sanding
- Prime door
- Paint (possibly multiple coats with wet sanding for high gloss) 1/2 way done, outside is painted
- Darken screws in hinges
So far so good. I really feel like I got a fair amount of work accomplished during the WEEK OF ALEX. What do you think? Should Wendy be happy with what I've done, or should she come back into town tonight shaking her head and asking "WTF have you been doing, acting like this is a WEEK OF ALEX or something?" To which I will say, "I no acting, Baby!"