Last week marked a major milestone in the saga of the front vestibule project. After months of laborious effort with tedious paint stripping, restoring, woodworking, door hanging, glass cutting, window glazing, measuring, trimming, shimmimg, shaving, adjusting, bleeding, sweating, crying, arguing…you get the picture, we finally made the significant step of painting the exterior doors.

I know, I know, painting shouldn't really be considered a major step when we've already covered painting the interior front door, but I assure you, this is a horse of a different color.

Once we had the astragal and drip edge attached, we test hung the doors to verify their basic function. Satisfied that all was set, we moved onto the next step of painting. However, this wasn't any normal approach to painting.

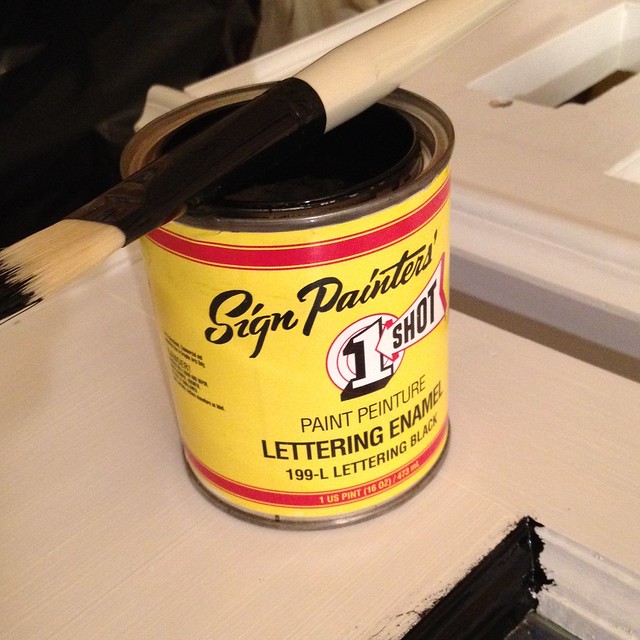
Several months ago I was browsing around on Apartment Therapy and came across a furniture paint project that one of the contributors had completed. The paint the project’s owner used turned out so wonderfully smooth and super high gloss that I immediately said “That’s how I want our front doors to look!” Luckily, the project outlined the specific brand of paint the piece’s owner had used. The brand of paint was one I had not heard of before, so it piqued my curiosity.

The paint was called 1 Shot, so I relied on my trusty friend and colleague, Google, for some fact finding. What I found was a high quality and very high gloss oil based enamel paint developed for professional lettering and sign painters. It also seemed to be used extensively for things like automotive pin-striping and detail work. 

The 1 Shot website has a section called “Ask Louie” where you can submit a question to their expert technical staff. I sent in a message to inquire about using their product on our front door to achieve a high gloss and high quality finish and heard back within 24 hours. Louie had some good news for me. Not only was our situation a perfect job for their paint, he also provided me additional information about what primer we should use, which brushes work best, and how to best apply the paint. To say Louie was helpful is a major understatement.

I got to work buying the paint that we would need for the french doors. Unfortunately, this isn’t just normal “run out to the store and pick it up” type of paint, so just the purchasing process was no small task. I found a place on Amazon to purchase the paint in a one pint container, as well as the brush cleaner I would need, but the primer proved to be more difficult. The primer Louie suggested was their special “chromatic” primer. I could not find a supplier online or a local distributor anywhere that carried it. Again I turned to the 1 Shot staff and gave them a call. They helped me out and arranged for a drop ship by purchasing over the phone from a local distributor. The one quart can of primer showed up at our house about three days later. Not too shabby.

Before I go any further I’ve got to tell you, this paint is not cheap. The one quart can of primer was $30, and the one pint can of paint was another $20 with shipping. I really hoped it would achieved the look we were going for -- a door so shiny you could see your reflection in it, almost like the famed door of the home of Britain's Prime Minister on 10 Downing Street. Otherwise I knew my better half would not be thrilled at spending this much money on a failed attempt.

Last week we got to work on the primer, and I have to say, this was the nicest primer I’ve ever worked with. The primer had excellent coverage, went on very smooth, flowed nicely after painting it on, dried quickly, and was able to be sanded without coming completely off of the doors. This is a pretty significant difference from what I’m used to on non-oil based primer (this is a vinyl primer).

Although it dries quickly, you need to give this primer a full 12-16 hours before applying the top coat. So after the obligatory wait time passed, I wet sanded the dry primer with a 600 grit sandpaper, much like I had done for the front door when we were painting it last month. At last, we had reached that long anticipated milestone of painting the exterior of the french doors.

Painting was a slow go. We had purchased two different natural bristle brushes, just like Louie told us to. One was a Purdy brand brush I had used on the new front door, and the other was a natural hair artist’s brush we picked up at Michaels craft store.

Since this is a french door that will be exposed to the elements, including the ocassional driving rain, I had to paint the mullions very carefully. In this case, the paint is the door’s final line of defense to keep the water from getting down into the back bead of glazing and drying it out. For this reason it is very important to get a small bead of paint on the glass to actually bridge the gap between the wood, glazing, and window. This important step of painting aims to make the glazing waterproof to help the door and paint job last as long as possible.

With six panes of glass on each door, it was a slow process, and one that really put a zing in my back. This may have explained my general crankiness while painting, as well as my awesome choice of socks and shoes.

Wendy and I tagged teamed the paint process. While I worked to paint the mullions and area right around the glass, Wendy used the 2” ShurLine rollers Louie suggested we use on the flat parts of the door. We were able to knock out one side of both doors in the matter of about two or three hours, and I’d say the majority was my very careful work around the glass.

We gave the first coat of paint a couple of days to dry, wet sanded with 1500 grit paper, and then went on with the second coat. The second coat went way fast since I didn’t have to move so slowly around the glass. Just look at how glossy and reflective this paint is. You can pretty easily see my looking back at the camera.

While I was painting the second coat, I was having difficulty determining where I had and hadn’t painted, that’s how shiny this paint dries.

Because the 1-Shot paint needs to be applied and dry flat (otherwise it will sag too much while drying) we have to wait to paint the interior side of the doors. I plan on waiting a few weeks until the outside paint is 100% dry and cured before I lay this flat anywhere. The last thing I want to do it damage the paint at this stage of the game.

So what do you think? Does it look good to you? (Try to ignore the dirty panes of glass and missing knob/hardware when you make a judgement.) Shiny? Black? Interesting? Or perhaps we should have focused our efforts elsewhere? At any rate, I hope we have a good set of doors that will last a very very long time. 

If you're looking for a super high gloss and durable paint with excellent flow characteristics, look no further than 1 Shot. It is a bit pricey, but it sure gives you the look you are going for. 

Did you enjoy reading this post? Want to learn more about our first-hand experiences with other tools, devices or items used throughout our renovation? If so, check out our complete list of product reviews in our Toolbox Tuesday section. 

Note: We weren't compensated for this review. We simply want to share good products when we see them, and hope that learning from our mistakes can help save you time, money and frustration.

Comments 23

Comments

Steve
11/15/2011 at 10:43 AM
Man, that looks incredibly classy. And the touch of color on the front door you chose looks really nice behind the simple black doors. I dig this. Way to go, you guys. Looks incredible.
tiffany
11/15/2011 at 11:15 AM
that looks fantastic! i absolutely love it. this is exactly the paint i want for our front door. do you think this super shiny black will be ok on a western facing mahogany door with no overhang to protect it from brutal cleveland snow and sun? great job! :)
Wendy
11/15/2011
Thanks Tiffany. I would think the paint should hold up on a western facing door with no overhang (that's what our door is after all), but we certainly don't have the winters that you do in Cleveland. You might want to ask Louie ([email protected]) just to be sure.
11/15/2011 at 11:24 AM
Awesome work. The results really speak for themselves! I agree with the comment above about the pop of color on the other door showing through, behind the French doors. Also, the black door goes well with the gray house and white trim around it. Very sharp!

OK. So I've only ever dry sanded before. How do you wet sand? I'd be worried about water and wood and swelling and all sorts of related problems, but clearly this is how you get that perfectly smooth base surface.

Looking forward to seeing your completed doors with hardware. Though probably not as much as you guys are. ;-)
Wendy
11/15/2011
Hi Thad. It's actually far easier than we originally thought (at least the way we do it is). The secrets to wet sanding are a good sanding block, very fine grit sandpaper, a coat of paint with adequate coverage, some paper towels, and just a little bit of water.

Check out this post for the paper I used: www.oldtownhome.com/2011/8/22/While-the-Cats-Away-the-Mice-Will-Play

We'll
be doing a more in depth post on it at some point, maybe with video, but this should do for now.

1. Prepare your sanding block with the correct paper for the step.
2. Place a little water on your paper towel.
3. Wipe the surface with the damp towel.
4. Slowly sand with the block. You'll notice you can't go fast and that the paper almost sucks onto the surface.
5. Dry the surface pretty much immediately with another towel.

No need to worry about water getting sucked in, it should stay on the paint (you aren't really getting to bare wood).

You don't need to sand much this way, just enough to take of the high spots. Then your next coat fills in low spots. Wash-Rinse-Repeat.
11/15/2011 at 9:32 PM
Aha... more like "damp sanding" than wet. I my imagination, I was picturing more or less dumping a glass of water on the surface and going to town. I see how there's very little risk of swelling doing it this way.

I have a small project coming up that requires a glossy, preferably mirror finish; I'll be trying this out on it.

Thanks!
11/15/2011 at 11:35 AM
Wow I think they look fantastic! Really sleek and modern x
11/15/2011 at 11:41 AM
This looks absolutely fantastic! Looks so great with the iron stair railing.
11/15/2011 at 3:43 PM
Whoa! that looks amazing -- as if the doors have been lacquered.
Thanks for sharing this -- it's remarkable!
Cass
Whitney
11/15/2011 at 8:55 PM
That is some amazingly glossy paint!! Great job you guys!! :)
Wow... the doors are looking mighty sexy!
JC
11/17/2011 at 8:53 PM
Alex, great job, and I love the look of the gloss black. A few comments and questions though, but please know that I'm not trying to nitpick or put down your hard work. The doors look AWESOME.

First: are the decorative muntins (routed side) on the INSIDE of the door or the OUTSIDE? From the photos it looks like you put them on the outside. Generally, (as far as I know) it should always be the glazed side to the outside, no? All my porch windows are like this (fancy side in, glazed side out), and pretty much every single wood window I've ever seen was the same. I suppose if the paint job stays nice it should be fine, but I believe the main reason for the glazed-side-out is because it sheds the water easily.

2: As a professional cabinetmaker, I'm used to seeing flawlessly smooth finishing jobs, and from experience, the only way to get it (flawlessly smooth "car finish") is with spray equipment. Did Louis not suggest a spray application for the paint? Seems like it would have been much faster, easier, and 100% brush-mark free. The drawback is that everything not being painted needs to be masked-off with tape/paper. I see you already have an air compressor, so you just need a decent spray gun. You'd be amazed how quickly you could spray paint a door with the right gun. In our booth/set-up at work, an entire set of kitchen doors (say 50-ish?) can be sprayed in under an hour (one side). It takes about as long to spray a door as it does to walk over to the rack and get the next one.
Alex
11/18/2011
JC, thanks for the compliments, and also the commentary. You are absolutely right on both accounts, and believe me, we discussed them at length. Both of your points are excellent.

1. The decorative side of the muntins. Like you I know that in 99.9% of applications (windows and interior doors) the glazed side faces away from the structure. As you said, it is this way to shed water more efficiently. A secondary aspect of this is meant to dress up the interior of the room with a slight decoration. We went back and forth on this a couple of months ago when we were attaching the hinges. What we decided, and hopefully not to a fault in the long term, was to mount them with the decorative side out.

This may seem strange, but we had a method to our madness. The justification was that 1. it was in an opening that would essentially not be visible inside the majority of time, so why not have the decoration outside, 2. The warp of one of the doors forced our hand a bit, as I'd rather have it lean out slightly than in, and 3. The doors sits in just enough of a recess from the front of the house that it doesn't take the huge brunt of rain the way the windows do. So I used all of this as a justification for why we could mount them the way we did. And a dirty secret of mine, I've actually lost sleep because of this decision, but I did a bang up job on painting and ensuring a good seal between the wood and glass that I'm pretty confident in it at this point.

I actually used to work in a window and door restoration shop and windows are 100% glazed to the outside, without question. But doors are sometimes glazed to the inside or are glazed and then nailed in place with wood strips (glazing strips?). We'll see how it holds up over time. Hey, one week in and it is still looking good. :-)

You second point about the finish was another thing that we went back and forth on. I've wanted a sprayer for years, but I've not known what kind/brand/type I needed or should purchase, so I've never gotten around to it. I hear HVLP is the way to go, but you can't use a standard compressor? I'm very unsure, and I plan on figuring it out at some point. But for this project, we opted to paint ourselves rather than taking them somewhere to have them sprayed. The spray booths are amazing, knocking stuff out ridiculously quickly, and they make me quite jealous. But for these doors, if only to match the rest of the house, we wanted them to be slightly brush marked, but not like laytex paint. We rolled the paint on and it was actually looking a bit too roller bumpy, so we ended up laying it off with the brush. Though, the paint was so smooth and wanted to flow so easily, that it smoothed itself out. The brush marks you see in the door are actually the brush marks from the first coat of oil primer I applied to the doors.

If you have any recommendations on sprayer, I'd absolutely love to hear them. When we get to painting a few pieces of furniture, and a vanity for the bathroom I'm sure I want to use a sprayer, as I'd prefer no brush marks. I had planned on taking it out to have it sprayed, but if I can do it myself, that is way better.

Thanks for the note and the questions. And don't worry, I didn't feel like you were nitpicking at all. If anything, I'd much rather know things I could do differently the next time than not.
11/18/2011 at 2:15 PM
That came out awesome. Good tip with the sanding between coats! That door shines like a showroom car.
Todd
12/11/2015 at 9:44 AM

For the most durable finish on 1-Shot, you must not thin the paint. The color will fade quicker if the paint is thinned with one of their low or high temp reducers or any other reducer. To spray 1-Shot you have to thin it. This would degrade your durability. Since time was not a concern for you, you chose the right method to apply 1-Shot, roller or brush.

JC
11/18/2011 at 8:47 PM
Well that's a relief!

As far as the glazed doors go, there are plenty of regular painted wood doors with decorations on both sides that have one side exposed to the elements, so weather it's a glass "panel" or a wood one, as long as the water doesn't seep into the cracks, you should be just fine. It definitely DOES look better to have them "fancy side out".

As for spray gun recommendations, I suppose it depends how much you want to spend, and how much spraying you plan to do. If you're like me, and you only want it for "hobby use" for occasional projects (like MAYBE once a month), then you can easily get away with using just a cheapie spray gun that you can find at a local DIY place. Generally, a half-decent "cheap" one will run around 100$ (as far as I can remember). On the opposite spectrum, at work we have a "pump" sprayer, which basically is a gun connected directly to a hose, that runs to a pump, then to a hose/siphon which you can stick directly into a large pail of sealer/lacquer and GO. But that kind of system costs thousands.

At my old place (previous cabinetmaking job with a much smaller set-up) we used just a plain gun.

There's two types you'll want to consider, as far as the shape/style, and that's gravity fed (cup on top) or siphon/bottom fed. I've used both, and I find that the bottom fed one tends to maneuver a bit more easily. All the ones we currently have at work are top-fed. The main advantage of the bottom cup one is that you can set it down to fill it. With the gravity ones, you need a special holder (basically a 2 prong fork) to hold it (you can't set it down at all so you need holders in strategic areas).

Devilbiss makes great guns.

This one is similar to the one we use at work (for small jobs where we don't want to dirty the pump):
www.killinjoke.com/reviews/devilbissgtiw.jpg

And this is the older style one like I used to use at the old place. Guns like these might be easier to find second hand (just make sure that the needle tip and nozzle are in good shape). I picked up two like these at yard sales for next to nothing (20$ each?). New, they run about 300$.
www.airspray-gun.com/photos/626-flg-5-suction.jpg

If you end up getting one, I can offer more tips and tricks for the actual spraying/cleaning/maintenance aspects, otherwise this "comment" will end up being 40 pages long.
Alex
11/20/2011
Thanks for all of the info, I'm definitely going to start looking into it. I have wanted a sprayer for some time, so this gives me a good excuse and starting point.

And not to beat a dead horse, but I also thought of one other reason why we mounted the doors with the decorative muntin side out, and I can't believe I forgot it.

So reason #4, that's the way the transom above it is done. The very exterior transom is a fixed transom, and it is still in its original position and location. We felt it would be strange to have the transom look one way and the door look different. It may be the first time I've ever seen a window glazed that way, but it is what it is.
Karen
11/21/2011 at 8:55 PM
They look great from the photos, but being an Alexandrian, I look forward to seeing them in person! I am amazed that you can paint around the panes without masking them off.....or do you just not worry about it and razor blade any paint off the glass? Another question....was the oil paint toxic-smelling? I don't think low-VOC oil paint is available yet, but I could be wrong.
Enjoy following your hard work and remarkable progress!
Andrew
6/16/2012 at 12:00 AM
Great site. For an ultra high gloss paint job I was curious which paint you would recommend. The Benjamin Moore that you used on the front door or the 1 shot that you used on the French doors. Which is glossier, easier to use, and most durable? Any help would be great.
Alex
6/20/2012
So far we like the 1 shot results quite a bit. The 1 shot is glossier, but the BM is easier to use. We'll do a post next week with a few update photos on both. I think we'll need to do another coat of the 1 shot this year on the flat surfaces, but I think that has more to do with being exposed to the weather than anything else.
Lucinda
9/15/2014 at 12:37 AM

Your doors are gorgeous!
We are redoing an old cedar chest and I hoped to find a high-gloss black but didn't have the first idea where to start. 1 Shot might be just the answer I need! It sounds like it might be quite a time investment if each surface needs to dry horizontally, but in this case the end would probably justify the means - especially if the paint can hold up to sharing a household with my sons.

4/6/2016 at 11:11 PM

I would LOVE LOVE LOVE this! We are just getting ready to move into our first house (we’ve been renting) and I have a TON of projects in my line up, the first being an old bench almost exactly like the one in your photo!Alt smile Thanks for the giveaway!

Rowie
5/1/2016 at 2:05 PM

That looks more stylish than Downingstreet 10!!

Since you've not signed in yet, you will need to fill in your name and email below. If you have a Facebook account, save yourself a step and use Connect to login.

Denotes a required field.

Please enter full URL, including http://

You can use Markdown syntax in your comment. And you can also use lots of Emoji!
  • Search

  • Login
  • Follow
  • Advertising

If you're looking for information on advertising and sponsorships, head on over to our sponsorships page. You can purchase site sponsorships in a few easy clicks. 

Toolbox Tuesday
Open Housing
  • We're Featured!

Old Town Home has been featured in the following places and publications:

The Washington Post
 
Washingtonian Magazine
 
Domino
 
Old House Journal
 
 
Apartment Therapy House Tour
 
Washington Post Express Feature
 
Home & Garden Blogs
 
© 2024 OldTownHome.com. - Privacy Policy

Unexpected Error

Your submission caused an unexpected error. You can try your request again, but if you continue to experience problems, please contact the administrator.

Working...

Working...